Machine Learning in Lucidworks Fusion
Summary
Classification, clustering, and collaborative filtering (“the 3 C’s of machine learning”) are now available in the Lucidworks Fusion application suite—from training your models offline in Fusion’s horizontally scalable Apache Spark cluster to serving these models as part of runtime query and indexing pipelines.
Supervised Machine Learning: Classification
Motivation
Imagine that you have a large e-commerce website with a diverse product catalog which is well segmented into a product-category hierarchy (categories like Electronics > Computers & Tablets > Accessories, Appliances > Ranges & Ovens > Ranges > Electric Ranges, and so on). Your product catalog is stored in a Solr index, to enable highly relevant full-text search for your customers. When search queries come in, results from several different product categories might match, and the best ones are returned at the top of the search results page. A query for “iPad” might yield a 32GB white iPad at the top, a 16GB one below that, a 32GB black one below that. This is usually exactly what you want.
But what happens if the query was “tablet case”? It would match iPad cases and other tablet cases in the product catalog best but, depending on the ranking factors you’re using, maybe the tablets themselves (not the cases) show up too (because their descriptions mention that they come with nice cases, perhaps), as well as cases for smartphones. This isn’t bad, and with a proper faceting UI, the user can select Electronics > Computers & Tablets > Tablets > Accessories (a category quite likely to have a large number of hits for this query) from the category facets and narrow down the results to remove tablets and smartphone cases from view.
However, a good rule of UX design is that each action you make users do increases the probability that they drop out of your funnel, getting distracted with something else, dissatisfied with what they see so far, or frustrated by not knowing what to do next.
What if we could analyze the query “tablet case” as it comes in, know with high certainty that the user wants results from the Electronics > Computers & Tablets > Tablets > Accessories category, and preemptively apply that facet filter? If most of the time users enter this query, that’s what they’d want to do, and only a minority of the time would they want to do something else, then we’ve shifted the users who have to do an additional action from the majority to a much smaller minority of users. People who don’t want to be in this category would then have to unselect this facet filter—an action that we would want to track to get feedback about how often users like and/or agree with our educated guesses about what they want to do.
Alternately, perhaps a query such as “tablet case” is a very broad query for anything in an entire category (it doesn’t specify brand, size, color, or really anything other than wanting to be in this deeply nested part of the category hierarchy). So, instead of merely applying a facet filter for this category, the user experience would be even better if we apply the facet filter and formulate a query that ensures that, of the top results in this category, we show at least one from each of the three top brands and at least two different colors? Or more simply, we could show results in this category sorted by popularity (or expected revenue/profit).
If only we had a way of knowing when a query is (a) clearly about just one category in the product catalog, and/or (b) when the query is very broad (but is still probably constrained to a category node).
Imagine no more! With Fusion 3.1, you can train your own query intent classifier which will, depending on what kind of training data you give it, let you categorize queries as they come in to Fusion. You could determine which product category the query is most appropriate to, or whether the intent of the query falls into one of several common query classes, such as known item search (for example, “32GB black iPad 3” or “Black & Decker cordless 150W power drill”), broad topic query (for example, “tablet cases” or “classical music CDs”), or help queries (for example, “how do I replace batteries” or “what is the return policy on video games”).
In each case, the query classifier will exist as a stage of a Fusion query pipeline. What you do with the results of a classifier is up to you. The scenarios above are just give you a flavor for what is easily possible.
Of course, a text classifier needn’t be limited to queries. labeling documents as they come through an index pipeline is another common use case. You might want to do this for many reasons. Imagine that you have the above-mentioned e-commerce storefront, with a well-labeled product catalog. You decide to build a marketplace that takes in inventory from third parties. If these new products don’t come with as high a quality product categorization (or perhaps the new products just have a different categorization than your in-house category hierarchy), then if you had a text classifier which was trained on your primary catalog, you could apply the classifier to these new products as well to extend these labels to the previously unlabeled items. Similar to the way a query classifier stage exists as part of a full query pipeline with logic you can control, you can follow an indexing stage that has a text classifier with additional logic, or you can simply take the output of the indexing stage and store it in a document field for inclusion in the index.
In Fusion 3.1, the process to train a classifier is the same independent of where you want to apply it—at query time or index time. In fact, you can use the same individual classifier model in both kinds of pipelines if the data it is applied to makes sense to do that.
Now that we have the motivation and use cases out of the way, how do you go about actually training and then using these models in Fusion? Let’s take a look.
Building a Document Classifier Step by Step
Returning to our e-commerce storefront example, let’s consider the slightly more straightforward problem of extending a classification system to more documents: the index pipeline classifier case. In this case, we have documents in our Solr index that have category labels in a stored field, and we want to train a classifier on this label set. At a high level, the process is roughly:
- Identify your training set – A Solr collection we’ll refer to as
training_collection, with a stored fieldcategory_sthat contains the category labels and a text fieldcontent_txtthat contains the data from which the system will extract features to perform the predictions. - Do some data-cleanup on this training set – Facet on the category_s field. Are all of the categories you expect there, with roughly the correct cardinalities? If you have a hierarchical categorization, do you have a field that just has the leaf nodes, or the level to which you want to classify? Are the categories relatively balanced? If one category makes up 90% of your content, it’s going to be hard to get high precision on the smaller categories. What you do in this step depends on your data, and it’s hard to give any hard and fast rules. This is the “art” of data science.
- Decide which classification model you want to train – Fusion 3.1 comes with two choices: Logistic Regression and Random Forests. We review some of the pros and cons of each below, but the summary is that, if you aren’t sure, most likely Random Forests are a good place to start.
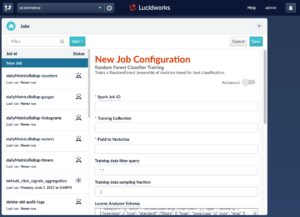
- Configure what kind of feature extraction/engineering you’re going to do – Your data starts out as raw text, but both logistic regression and random forests take numeric vectors as input, so you’re going to have to “vectorize” your documents. Vectorization in Fusion is a series of the following steps:
- Tokenization: Any Lucene/Solr tokenizer works here; see Steve Rowe’s blog post for details on how to choose one.
- Map tokens to vectors by:
-
-
- Count vectorization: Each token gets a unique vector index, and the bag-of-words for the document is translated into a set of counts of the number of times each token occurs in each document. Because it maps the frequency of occurrence of a term in a document into a number, this is known as term-frequency (TF) vectorization. Some of the factors to consider in this commonly used form of vectorization are whether you want to do what is known as a “head/tail chop” on the vocabulary: remove the far too common words (the head of the term-frequency distribution) because they don’t provide much signal, and similarly remove the very rare words (the “long tail”) that makes up most of the vocabulary, but each word occurs in very few documents. In Fusion, this is done by setting the
maxDFandminDFadvanced parameters on a classifier training configuration. Values between 0 and 1 (inclusive) are interpreted as fractions, and values greater than 1 are interpreted as absolute counts:maxDF= 0.9 means “keep all tokens that occur in less than 90% of the documents in the training set, whileminDF= 10 means “keep all tokens that occur in at least 10 documents”. In practice, picking a large fraction formaxDF, and a small count for minDF work for many problems, but by default they are set to 1.0 and 0, respectively, because the values depend on your vocabulary and training-corpus size.
- Count vectorization: Each token gets a unique vector index, and the bag-of-words for the document is translated into a set of counts of the number of times each token occurs in each document. Because it maps the frequency of occurrence of a term in a document into a number, this is known as term-frequency (TF) vectorization. Some of the factors to consider in this commonly used form of vectorization are whether you want to do what is known as a “head/tail chop” on the vocabulary: remove the far too common words (the head of the term-frequency distribution) because they don’t provide much signal, and similarly remove the very rare words (the “long tail”) that makes up most of the vocabulary, but each word occurs in very few documents. In Fusion, this is done by setting the
-
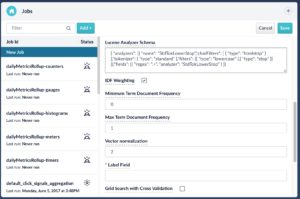
- Word2vec vectorization: While count vectorization associates each distinct token with a different integer index (leaving every token completely orthogonal to each other, regardless of whether they are semantically independent or not), the popular word2vec algorithm can learn a dense vector-embedding representation of the vocabulary of a corpus that encodes some of the semantics of the language of your training set. Similar words will point in similar directions in this space, and only relatively unrelated terms will really be (nearly) orthogonal.
In the Advanced settings for both ML training jobs (made visible by toggling the green Advanced slider at the top of the job configuration dialog), if you set the word2vec Dimension parameter to be a number greater than zero (word2vec comes with its own set of configuration parameters, briefly discussed below), you are indicating that you want to vectorize your documents in the following way:
-
-
- First, Fusion trains a word2vec model based on the tokenized form of your entire corpus.
- Second, Fusion applies the token-to-dense-embedding-space vector mapping from this model to the tokens of the document, creating one dense vector per token.
- Third, Fusion assigns the document the vector sum of all of these vectors.
-
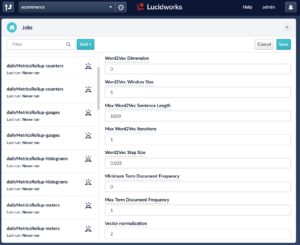
- Weighting: For TF vectorization, Fusion transforms the tokens into vectors and adds these vectors up. Because relatively rarer words are often more informative than very common ones, assigning more importance to the rare ones is often helpful for relevance, so you have the option of upweighting terms by their Inverse Document Frequency (IDF), before performing the vector sum (for word2vec featurization, the word vectors already encode some notion of their popularity.
- Normalization: A document that contains the text “Black 16GB iPad” and the document that contains “Black 16GB iPad. Black 16GB iPad. Black 16GB iPad. Black 16GB iPad. Black 16GB iPad” are conceptually approximately the same thing. To ensure that biases that favor long documents don’t develop, Fusion can normalize the length of the vectors output from the previous steps, using either the Euclidean length (known as L2 normalization) or the absolute value length (L1 normalization). Or Fusion can leave the vectors unnormalized.
An example configuration for training a Random Forest classifier might look like this:
{

type: "random_forests_classifier",

id: "random_forest_department_classifier_trainer",

modelId: "random_forest_department_classifier_model_w2v",

analyzerConfig: "{ "analyzers": [{ "name": "StdTokLowerStop","charFilters": [ { "type": "htmlstrip" } ],"tokenizer": { "type": "standard" },"filters": [{ "type": "lowercase" },{ "type": "stop" }] }],"fields": [{ "regex": ".+", "analyzer": "StdTokLowerStop" } ]}",

withIdf: true,

norm: 2,

w2vDimension: 200,

w2vWindowSize: 5,

w2vMaxSentenceLength: 1000,

w2vStepSize: 0.025,

w2vMaxIter: 1,

minDF: 10,

maxDF: 0.8,

dataFormat: "solr",

trainingCollection: "ecommerce",

trainingDataFilterQuery: "+longDescription:* +department:*",

trainingDataSamplingFraction: 1,

trainingDataFrameConfigOptions: { },

overwriteOutput: true,

trainingLabelField: "department",

sourceFields: "id,longDescription,department",

fieldToVectorize: "longDescription",

predictedLabelField: "labelPredictedByFusionModel",

gridSearch: false,

evaluationMetricType: "none",

randomSeed: 1234,

maxDepth: 5,

maxBins: 32,

numTrees: 20

}
Debugging Help
When Fusion trains a machine learning model on Spark, the Fusion API service spawns a “driver” JVM process, which logs its output to the file $FUSION_HOME/var/log/api/spark-driver-default.log. This is the place to look to debug issues with these training jobs (as well as $FUSION_HOME/var/log/api/api.log, if for example, the job doesn’t even start for some reason.
A successful run of the model training job is visible in a variety of ways:
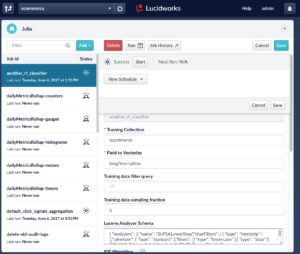
- Directly on the jobs configuration page, where you clicked Run> Start, you will eventually see the status Success to the left of the Start button.
- By polling the Spark job’s REST API for the status of all running, completed, and failed jobs:
http://$FUSION_HOST:8764/api/apollo/spark/jobs/random_forest_department_classifier
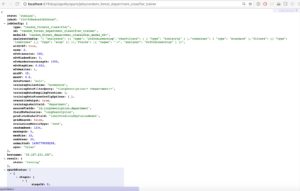
- By looking at the Spark web UI
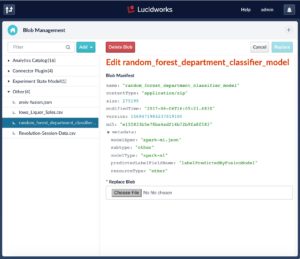
http://$FUSION_HOST:8767to see that the job you launched shows up as “completed”, and not “failed”. - The previous methods work for all Spark jobs launched from Fusion, but for classifier training jobs, what you really want to know is whether the job produced a trained model, and stored it in Fusion’s blob store. You can check this:
- In the Fusion UI under Devops > Blobs > Other. Look for random_forest_department_classifier.
-
- Via the HTTP/REST endpoint http://$FUSION_HOST:8764/api/apollo/blobs (to see all of them) or http://$FUSION_HOST:8764/api/apollo/blobs/sample_rf_classifier/manifest to get the status of this specific blob.
After you know the job completed successfully and the model has been saved to the blob store, it’s time to see the classifier in action!
Incorporating the Classifier into an Indexing Stage
Now that you have a model stored in the blob store, you can use it during indexing. As documents arrive, Fusion runs them through the classifier, which predicts which classes the documents should belong to, and stores labels for the predicted classes in a new (or existing) field in the documents.
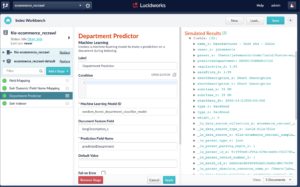
To do this in Fusion, you just need to add an indexing stage of type Machine Learning to an index pipeline. To easily and quickly tell how the results look, it’s easiest to do this in the Index Workbench, so consider setting up a new collection. You’re going to reindex the same data you trained the model on, but this time with the classifier applied as well. In practice, you might have trained your classifier on some categorized/labeled data, and then want to reindex the unlabeled subset back into the same collection to fill in the gaps. This will require modifying the index pipeline that you already have for that collection.
The primary configuration parameters for the Machine Learning index-pipeline stage are:
- Machine Learning Model ID: This is the ID of the model you trained and stored in the blob store.
- Document Feature Field: This is a Solr field in your input documents that you are going to feed into the model to generate predictions. If you’re not sure which field it could be, you might often have a catch-all
body_sfield that contains the entire document, and you can use this field.
Note: This doesn’t need to be the same field as the one you trained your model on above. It can be, if you’re doing the “extend the category labels from a subset of your collection to the rest” scenario we’ve been walking through, but sometimes you might train on one collection, with one set of fields for feature-extraction and labeling, and then index into a collection that has different fields, but hopefully fields that have similar content, so the classifier makes accurate predictions.
- Prediction Field Name: This is the name of the field in which you want to store the predicted labels for the document. It might be an existing field (in which case the predicted labels get appended to the existing data in this field) or a new field.
- Default Value (optional): You can apply a default value for this prediction field, if the classifier doesn’t return any result for a document.
- Fail on Error (optional): Cause the pipeline to fail fast on classifier errors, which might allow you to find issues more easily when debugging, or in cases when the prediction label forms a critical piece of the data of your index, and documents are simply not structured properly without this field being populated.
After you configure this stage, put it just before the Solr Indexer stage in the index pipeline, and watch to see the simulated results of the new pipeline. Your new field should be present and have sensible values. If it’s not there, check the log $FUSION_HOME/var/log/connectors/connectors.log and see whether there are any errors related to the model or the dataset.
Also note that what you do with the output of these classifiers is not limited to storing them raw in the index. Indexing pipelines are pipelines, so there’s no reason why you can’t create a pipeline stage that goes after the Machine Learning stage, and that triggers on its outputs in some way. For example, if a document is classified as spam, it could exclude the document from the index (via an Exclude Documents stage), or if it’s classified as contains PII (personally identifiable information), then a REST pipeline stage could initiate a call to a 3rd party service, or a JavaScript stage can implement whatever business logic you need.
Incorporating the Classifier into a Query Stage
While there are many “advanced” kinds of pipelines to consider for the Machine Learning index-pipeline stage, the primary purpose of the index pipeline is pretty straightforward: classify the content to be indexed, apply a class label to a field in the document, and index the document. When you want to classify user queries, the scenario becomes very product-dependent. Does your query classifier detect which document category is most likely what the user is searching for? Or does it detect that broad types of query intent are at play (“known item search” vs. “broad topic query” vs. “natural language question”)? Each of these are possibilities, but which type of query classifier you are able to train depends on what training data you have. If your document collection has categories associated with it, you can use the click-data to generate query-category labels: any query which has clicks on documents of one single category more than say, 90% of the time, could be reliably categorized as that category. For broad intent type classification, hand-labeling a few thousand queries from each intent type might be a good start (in this case, an approach known as active learning can be useful: train your initial classifier on the first couple of thousand labeled queries, then apply this classifier to the full set, and quickly review the results which the classifier had high confidence on to generate more labels. Then repeat this process with the newly expanded set of labeled queries).
But before we get to exactly what you can do with these query classifiers, let’s set up a query pipeline with our new model wired in, and see how it looks in the Query Workbench.
Taking the default query pipeline in the Query Workbench, and adding a new Machine Learning query stage is by itself very simple:
- Machine Learning Model ID: This is the ID of the model you trained and stored in the blob store.
- Query Feature Field: This is the query parameter from which to pull the features you want to classify. By default, it’s the q field, where the main text of a user’s query will go.
- Prediction Field Name: This is the query parameter in which Fusion will store the output of the classifier, which by itself might not do very much to your query results, unless this parameter is directly understandable by Solr.
- Default Value (optional): You can apply a default value for this prediction field, if the classifier doesn’t return any result for a document.
- Fail on Error (optional): Cause the pipeline to fail fast on classifier errors, which might allow you to find issues more easily when debugging, or in cases when the prediction label forms a required piece of the data of your query, and documents are simply not structured properly without this field being populated.
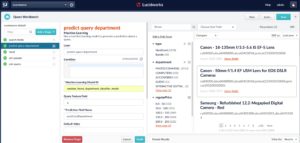
Let’s do a query for “50mm” (as if we’re looking for camera lenses):
As mentioned above, at this point you need to decide what to do with the search request now that you’ve applied a new query parameter, such as predictedDepartment, to it. In the motivational scenario described at the start of this article, we imagined auto-applying this prediction as a facet filter, to remove a navigational step for our users. Now, you have the tools to do this. You add one more simple query-pipeline stage, in this case an Additional Query Parameters stage, in which you apply a filter query with Solr’s fq parameter, with the value: department:”${predictedDepartment}”. This syntax tells Fusion that you want to do variable substitution of one query parameter into another string so that, if the Machine Learning query-pipeline stage determines that the q parameter relates to the department Photo/Commodities, then this additional query parameter stage appends an &fq=department:”Photo/Commodities” query parameter onto the request. Note that the predictedDepartment parameter is wrapped both in curly braces (to do the variable substitution) and double quotation marks (to ensure the full predicted department string gets treated as an exact match, in case it contains whitespace or special characters).
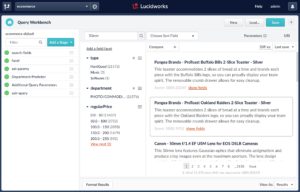
Now, you see that the combined effect of the Department Predictor and Apply Department Filter stages restricts the result set down to only catalog items in the Photo/Commodities department (this is true in both the search results themselves and thus in the facet counts as well).
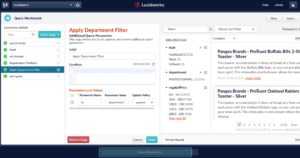
There are other things you can do with the classifier stage in your query pipeline. For example, instead of applying the result as a category filter, you could simply boost results that are in a category, affecting the search relevance but not the UX. Or, if the request was detected to be a natural language query such as “how do I return my refrigerator”, the query pipeline could pass the request through an NLP stage to part-of-speech tag it further (and only pass on the noun phrase terms, perhaps), or hit another collection entirely (for example, the FAQ collection).