Noob* Notes: Fusion First Look
This is a record of my coming up to speed on Fusion, starting from zero. I’ve just joined the Lucidworks team to write documentation and develop demos. I’d like to dedicate this my first post to developers who, like me, know enough about search and Lucene and/or Solr to be dangerous employable, but who haven’t used Fusion — yet.
Getting Started
I like to click first, read the docs later, so the first thing I do is find the Fusion download page. I download Fusion (version 1.1.1). It’s a gzipped tarball with a README.txt file that points to the online documentation. Looks like I have to read the docs sooner rather than later.
The installation instructions are straightforward. My Mac is running Java7 JDK (build 1.7.0_71-b14) but I don’t have an existing Solr installation, so I need to start Fusion with the embedded Solr instance. I run the bin/fusion start command, point the Chrome web browser at http://localhost:8764, and login. The Fusion UI shows 5 icons: Admin, Quick Start, Relevancy Workbench, Search, Banana Dashboards. I click through each in turn. The Banana Dashboard is especially impressive. This looks very different from the Solr Admin UI, that’s for sure.
The instructions in the Getting Started page start with the Admin app. Following the steps in the First 5 minutes with Fusion, I create a Collection named getStarted, and a web Datasource named lucidworks. The concept Collection is familiar from Solr; it’s a logical index. Datasources are used to pull data into an index. Indexing the Lucidworks web pages starting from the URL https://lucidworks.com retrieves 1180 documents.

On a slow cable internet connection, this took 5 minutes. At this point I’ve spent about 3 minute staring at and clicking through the Admin UI, and 5 minutes reading the Lucidworks docs. It’s always prudent to multiply a time estimate by 2 (or 3), so if I can carry out a few searches in under 2 minutes, my first 5 minutes with Solr will have taken 10 minutes my time, plus 5 minutes indexing. I run a series of searches: “Lucidworks” returns 1175 documents, “Lucidworks AND Fusion” returns 1174 documents, “Java AND Python” returns 15 documents, “unicorn” returns 0 documents. That took no time at all. I’ve got a Collection and the search results look sensible. By following the instructions and ignoring everything I don’t understand, my first 5 minutes with Fusion have been a total success.
A Real Problem
So far I’ve kicked the tires and taken a drive around the parking lot. Time to hit the road and index some fresh content. My go-to test case is the content available from the National Library of Medicine. The NLM maintains databases of drugs, chemicals, diseases, genes, proteins, enzymes, as well as MEDLINE/PubMed, a collection of more than 24 million citations for biomedical literature from MEDLINE, life science journals, and online books. NLM leases MEDLINE/PubMed to U.S. and non-US individuals or organizations, distributed as a set of XML files with top-level element is <MedlineCitationSet>. Each citation set contains one or more lt;MedlineCitation> elements. Every year, NLM releases a new version of MEDLINE, a revised DTD, and a sample data set. Can I index the MEDLINE/PubMed 2015 sample data as easily as I indexed lucidworks.com?
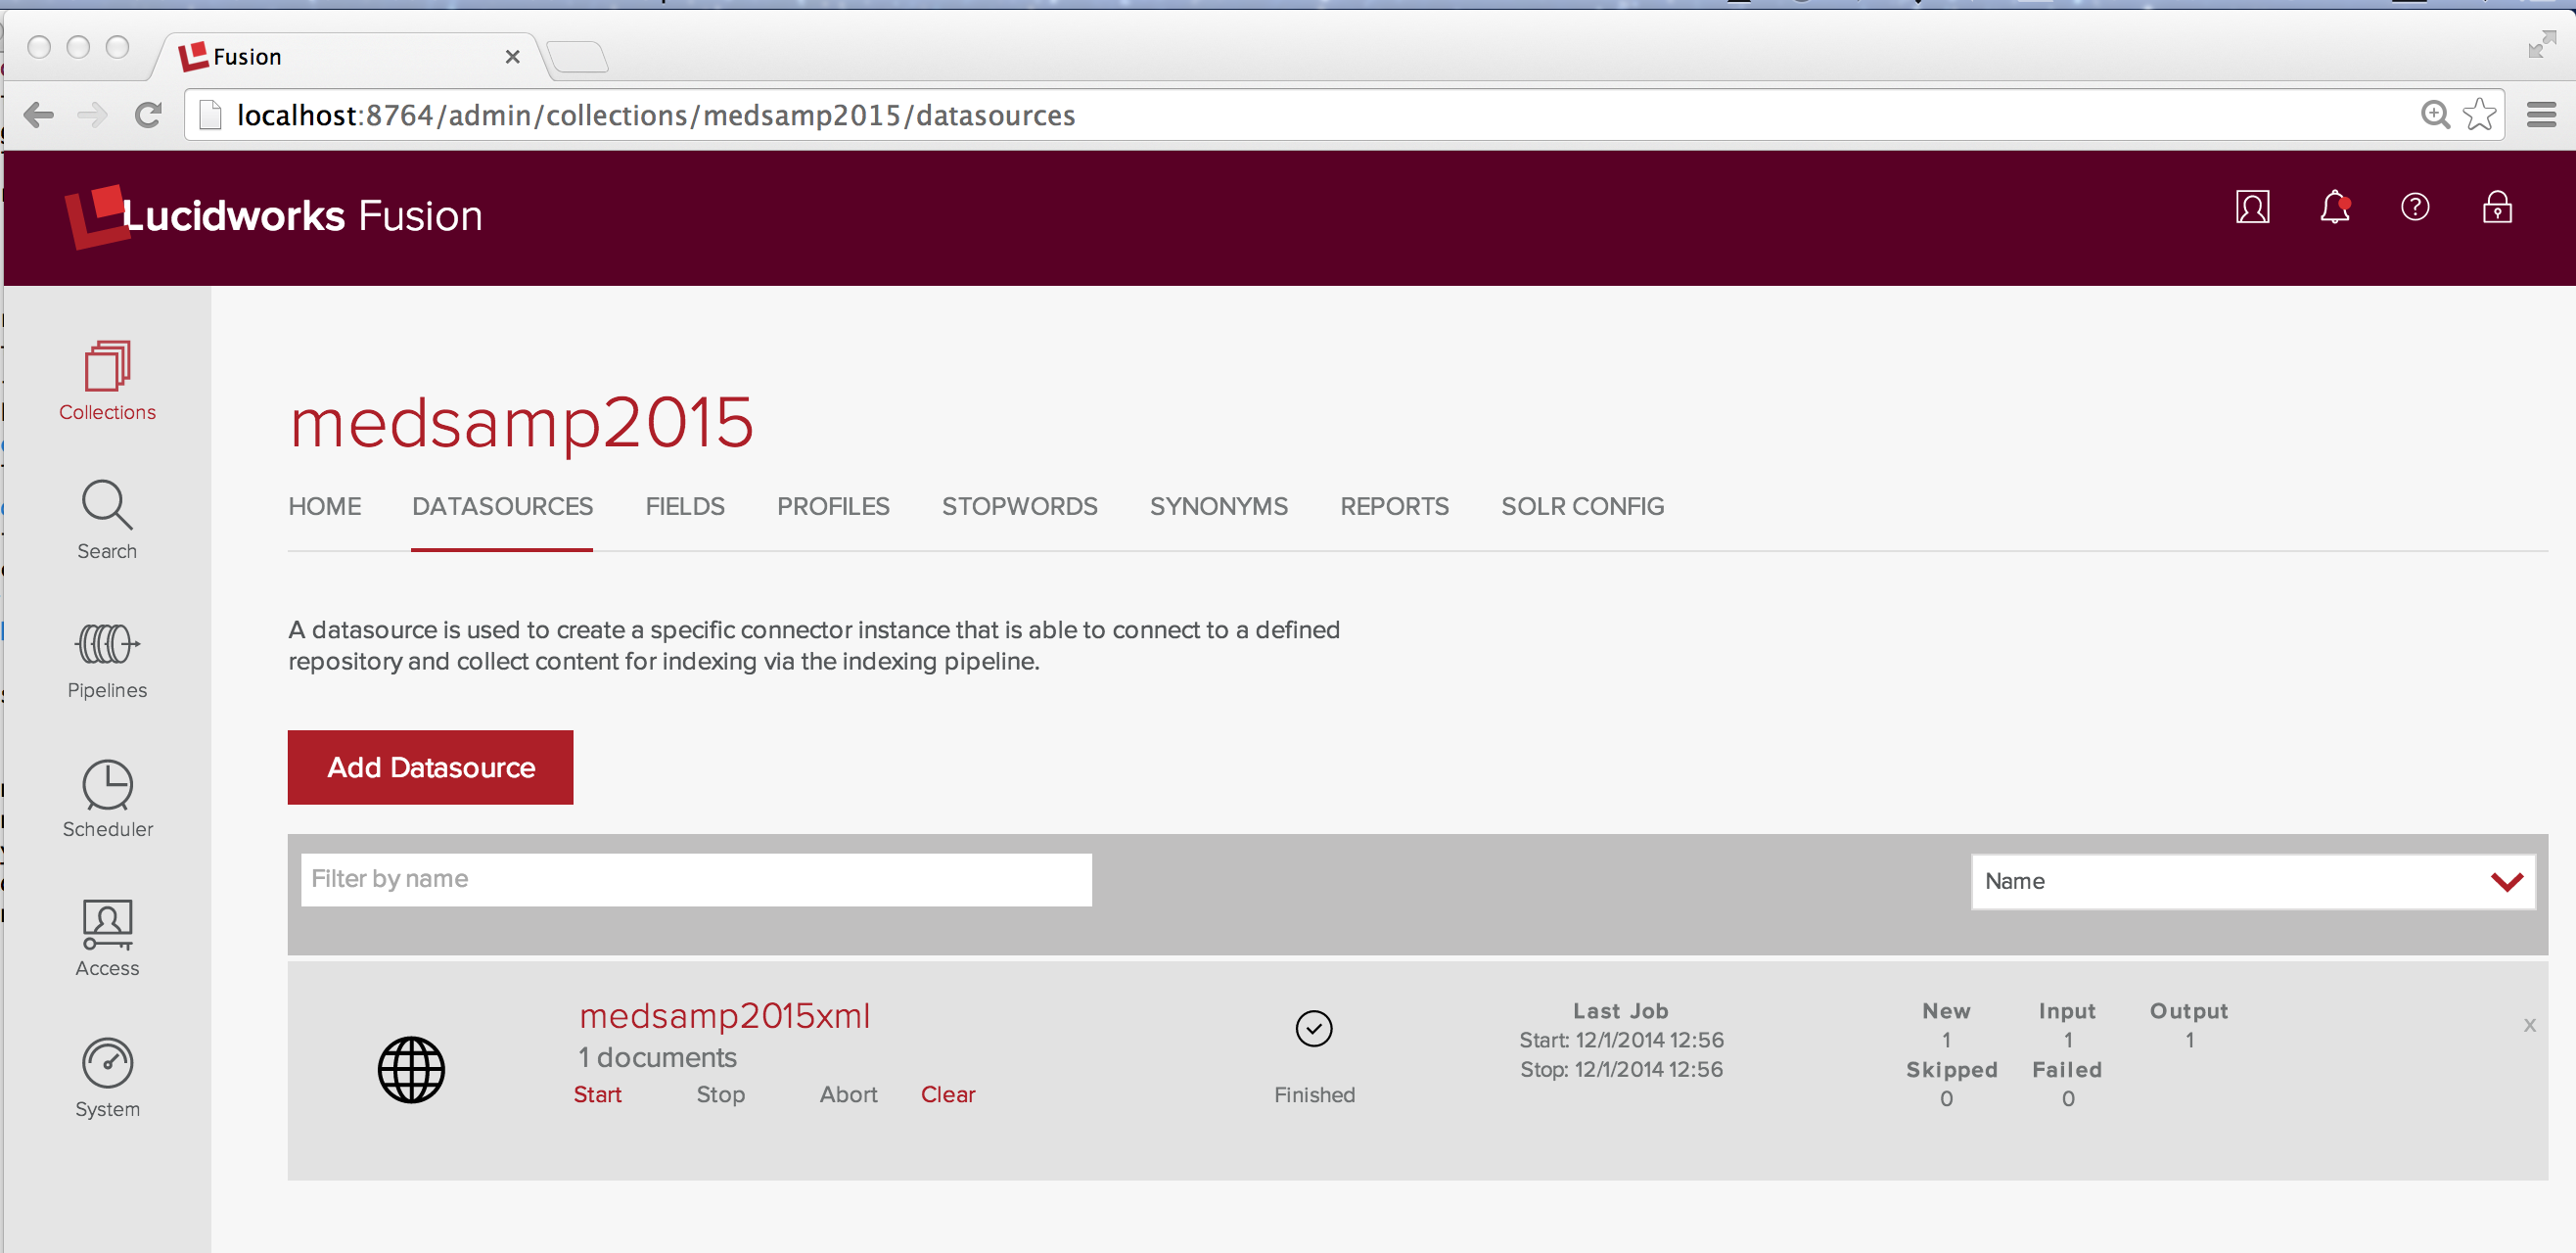
The answer yes I can index the data, but it takes a little more work because a specialized document set requires a specialized index. I demonstrate this by failure. Working through the Fusion Admin UI, I create a new collection called Medsamp2015. As before, I create a web datasource called medsamp2015xml and point it at the MEDLINE/PubMed 2015 sample data file. Fusion proceses this URL into a single document.
Since there’s only one document in the index, I use the wildcard search “*” to examine it.
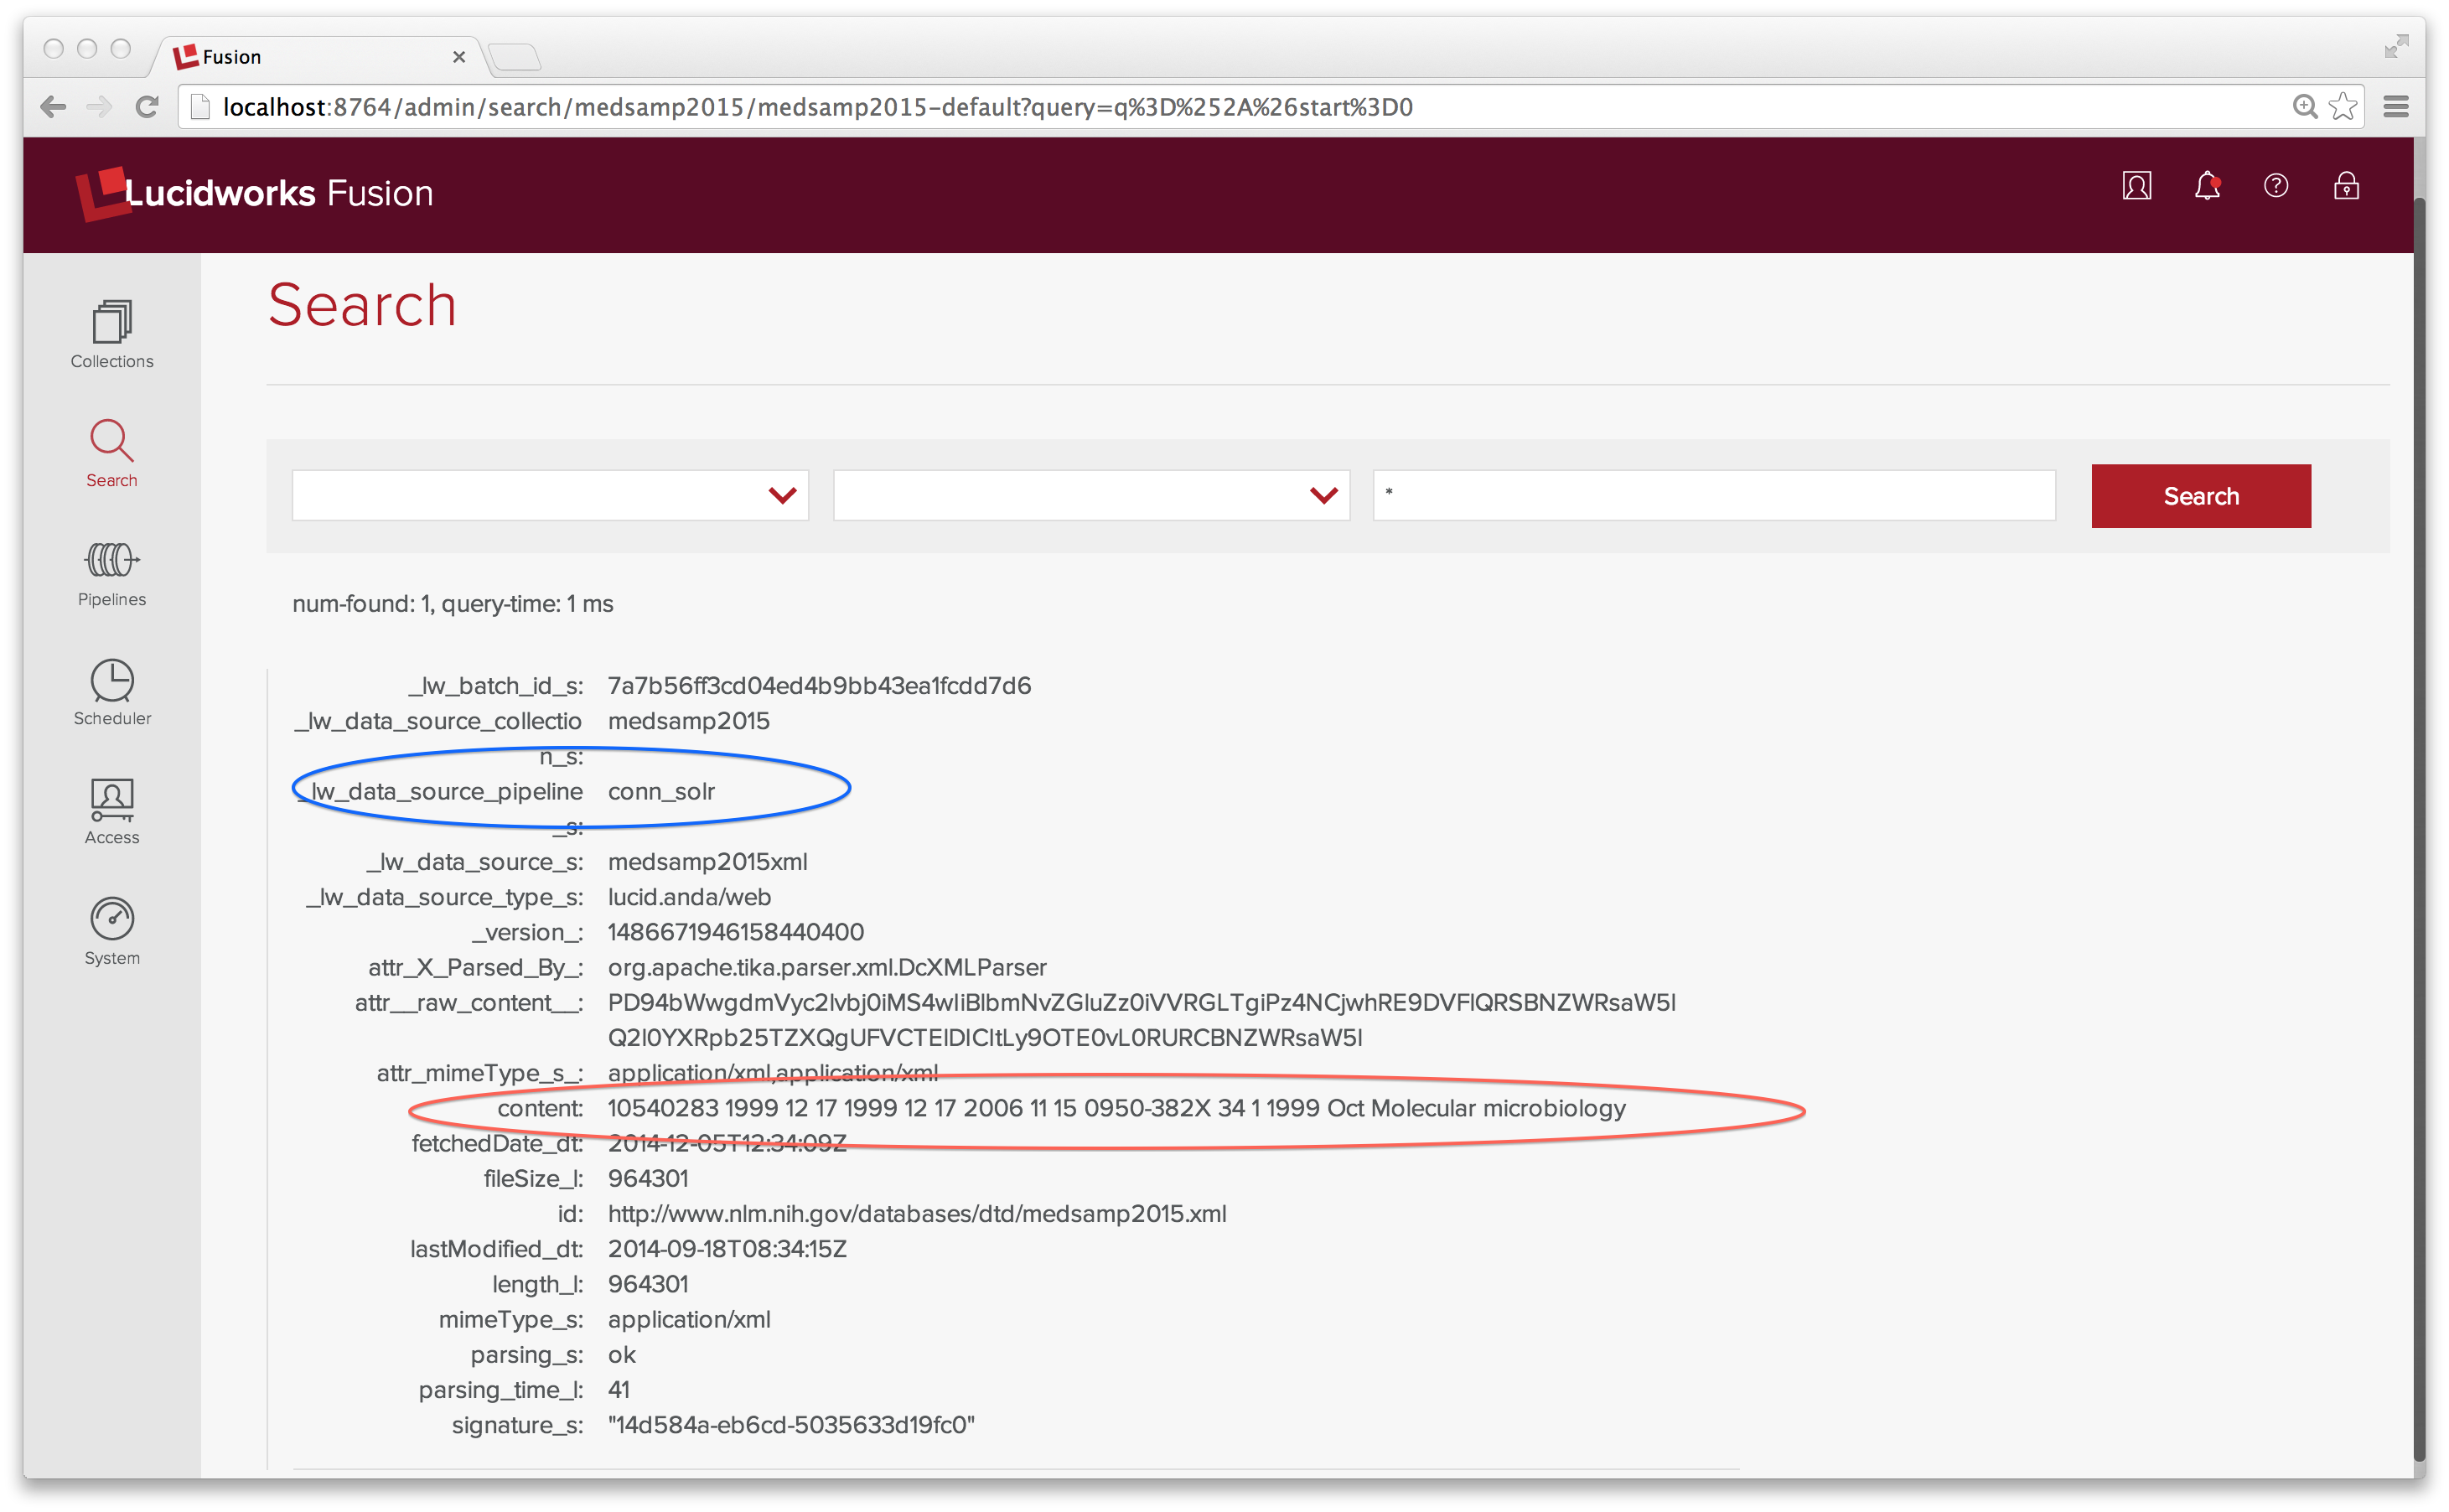
The content field contains the text of all elements in the XML file. Definitely not the indexing strategy I had in mind. The MEDLINE 2015 sample data file has one top-level element <MedlineCitationSet> and 165 <MedlineCitation> elements. What I want to is to index each <MedlineCitation> element as its own document.
A Real Solution
A Fusion datasource is coupled with an Index Pipeline. Pipelines are powerful, but require configuration. With a little lot of help from the Fusion developers, I was able to create an indexing pipeline for the Medline data. Here’s a report of what I did, what worked, and what didn’t.
Pipelines are comprised of a sequence of stages. The conn_solr pipeline is a general-purpose document parsing pipeline composed of the following stages: an Apache Tika Parser index stage; a Field Mapper Index stage; a Multi-value Resolver stage; and Solr Indexer stage. The Tika Parser interface provides a single mechanism for extracting both metadata and data from many different sorts of documents, including HTML, XML, and XHTML. The field mapper index stage maps common document elements to defined fields in the default Solr schema. The Multi-value Resolver stage resolves conflicts that would otherwise arise when a document contains multiple values for a Solr field which is not multi-valued. Finally, the Solr indexer stage sends documents to Solr for indexing.
Beause there’s a close connection between a datasource and the processing applied to that data, when possible, the Fusion Admin UI provides a default index pipeline ID. For a web datasource, the default index pipeline is the conn_solr pipeline which provides field mappings for common elements found on HTML pages. In the Getting Started example above, there was a one-to-one correspondence between web pages and document in the Solr index.
For a Medline XML file, additional processing is required to transform each citation into a fielded document for Solr. The indexing pipeline required looks like this:
- Apache Tika Parser
- XML Transform
- Field Mapper
- Solr Indexer
This pipeline looks superficially similar to the conn_solr index pipeline but both the Tika Parser and Field Mapper stages are configured quite differently and an XML Transform stage is used to map specific elements of the Medline XML to custom fields in the Solr document. A Multi-value Resolver stage isn’t necessary because I’ve set up the mapping so that multi-valued elements are mapped to multi-valued fields. The configuration of the Solr Indexer remains the same.
The new Fusion Admin UI Pipelines control panel can be used to define both index and query pipelines. It’s also possible to define pipelines through the Fusion REST API. As a noob, I’m sticking to the Admin UI. After clicking through to the Pipelines control panel, Index Pipelines tab, I create a new Index Pipeline named medline_xml, then add each stage in turn.
When a new stage is added, the Pipeline panel displays the configuration choices needed for that stage.
Apache Tika Parser Configuration
To process the MEDLINE XML, I need to configure Tika so that it doesn’t try to extract the text contents but instead passes the XML to the next stage of the indexing pipeline. I’ve captured the config that I need in the following screenshot and circled the setting that I had to change from the current default in red:
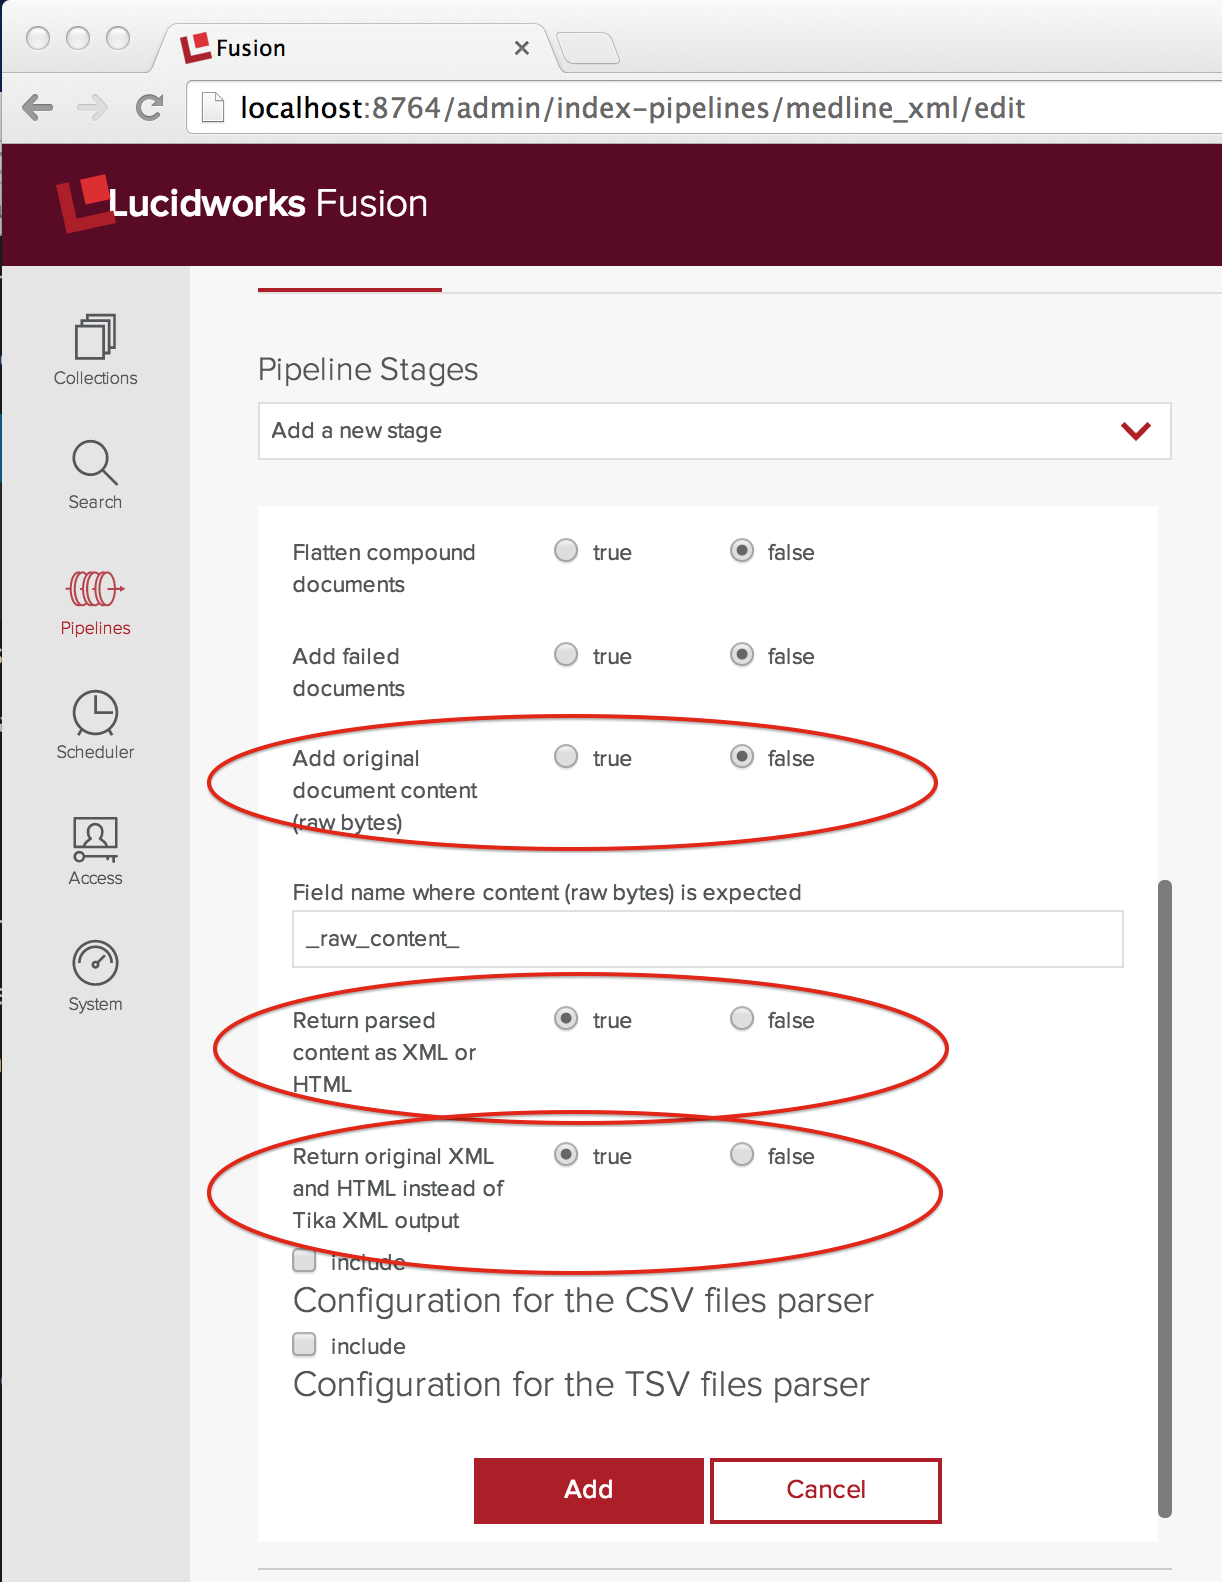
The control addOriginalContent is set to false and both controls “Return parsed content as XML or HTML” and “Return original XML and HTML instead of Tika XML” are set to true. The latter two controls seem redundant, but they’re not and you’ll need both set to true to work. Trust me.
XML Transform Configuration
The XML Transform stage does the mapping from nested XML elements into a fielded doc for Solr. After adding an XML Transform stage to my pipeline and naming, I get down to specifying that mapping. The following screenshot shows the key configurations:
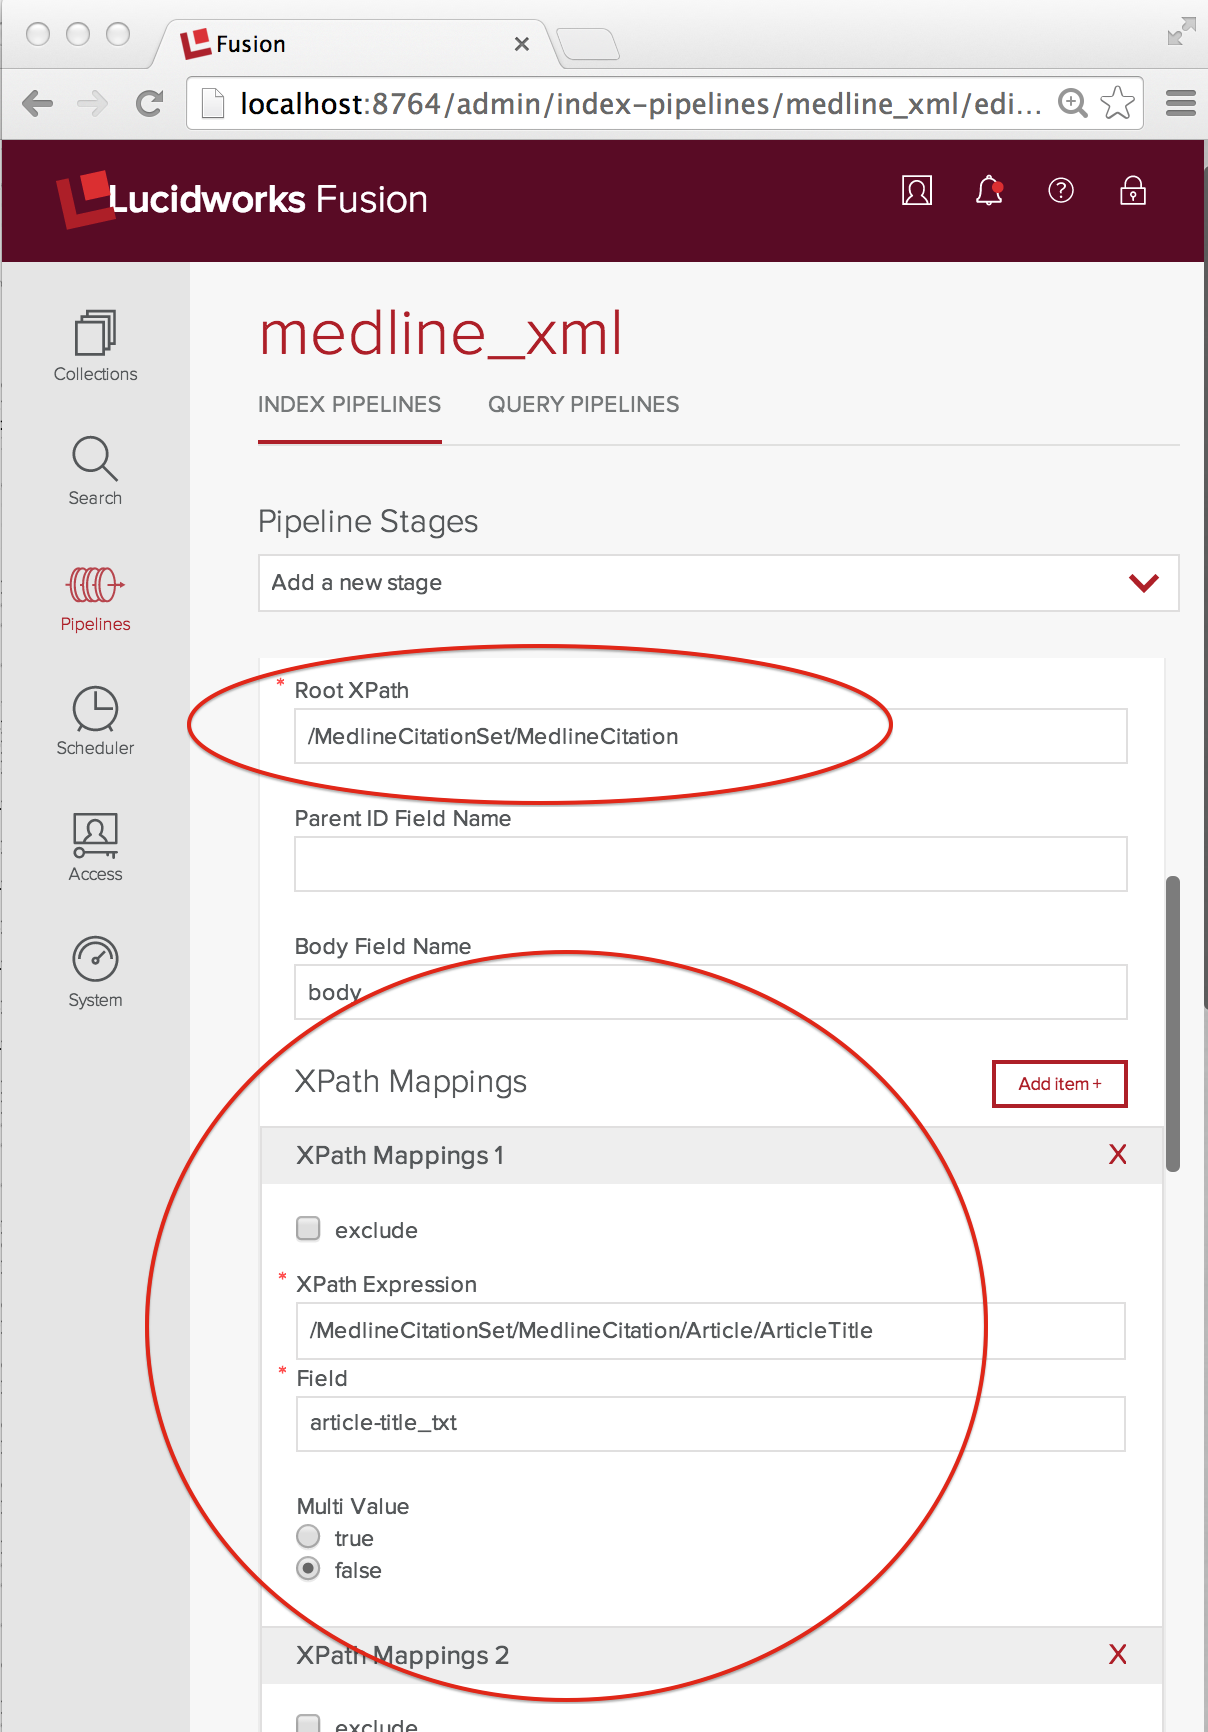
Because we want to index each MedlineCitation element as its own document, the Root XPath element is set to the full XPath “/MedlineCitationSet/MedlineCitation”. XPathMappings pick out the elements that map to fields in that document. For my document fields, I use the Solr dynamic field naming conventions. Each MedlineCitation is assigned a unique integer identifier called a PMID (PubMed ID). In this example, flattening the MEDLINE XML into a Solr doc is straightforward. The XPathMappings used are:
- “/MedlineCitationSet/MedlineCitation/Article/ArticleTitle” maps to “article-title_txt”, Multi Value false
- “/MedlineCitationSet/MedlineCitation/Article/Abstract/AbstractText” maps to “article-abstract_txt”, Multi Value true
- “/MedlineCitationSet/MedlineCitation/MeshHeadingList/MeshHeading/DescriptorName” maps to “mesh-heading_txt”, Multi Value true.
There’s a lot more information to be extracted from the XML, but this is enough for now.
Field Mapper Configuration
It’s complicated, but because I’m using Tika and an XML Transform, I need a Field Mapper stage to remove some of the document fields created by Tika before sending to document to Solr for indexing. On the advice of my local wizard, I create mappings for “_raw_content_”, “parsing”, “parsing_time”, “Content-Type”, and “Content-Length” fields and set the mode to “delete”.
Solr Indexer Configuration
I set the “Buffer documents” for Solr option to true. This isn’t strictly necessary. It just seems like a good thing to do.
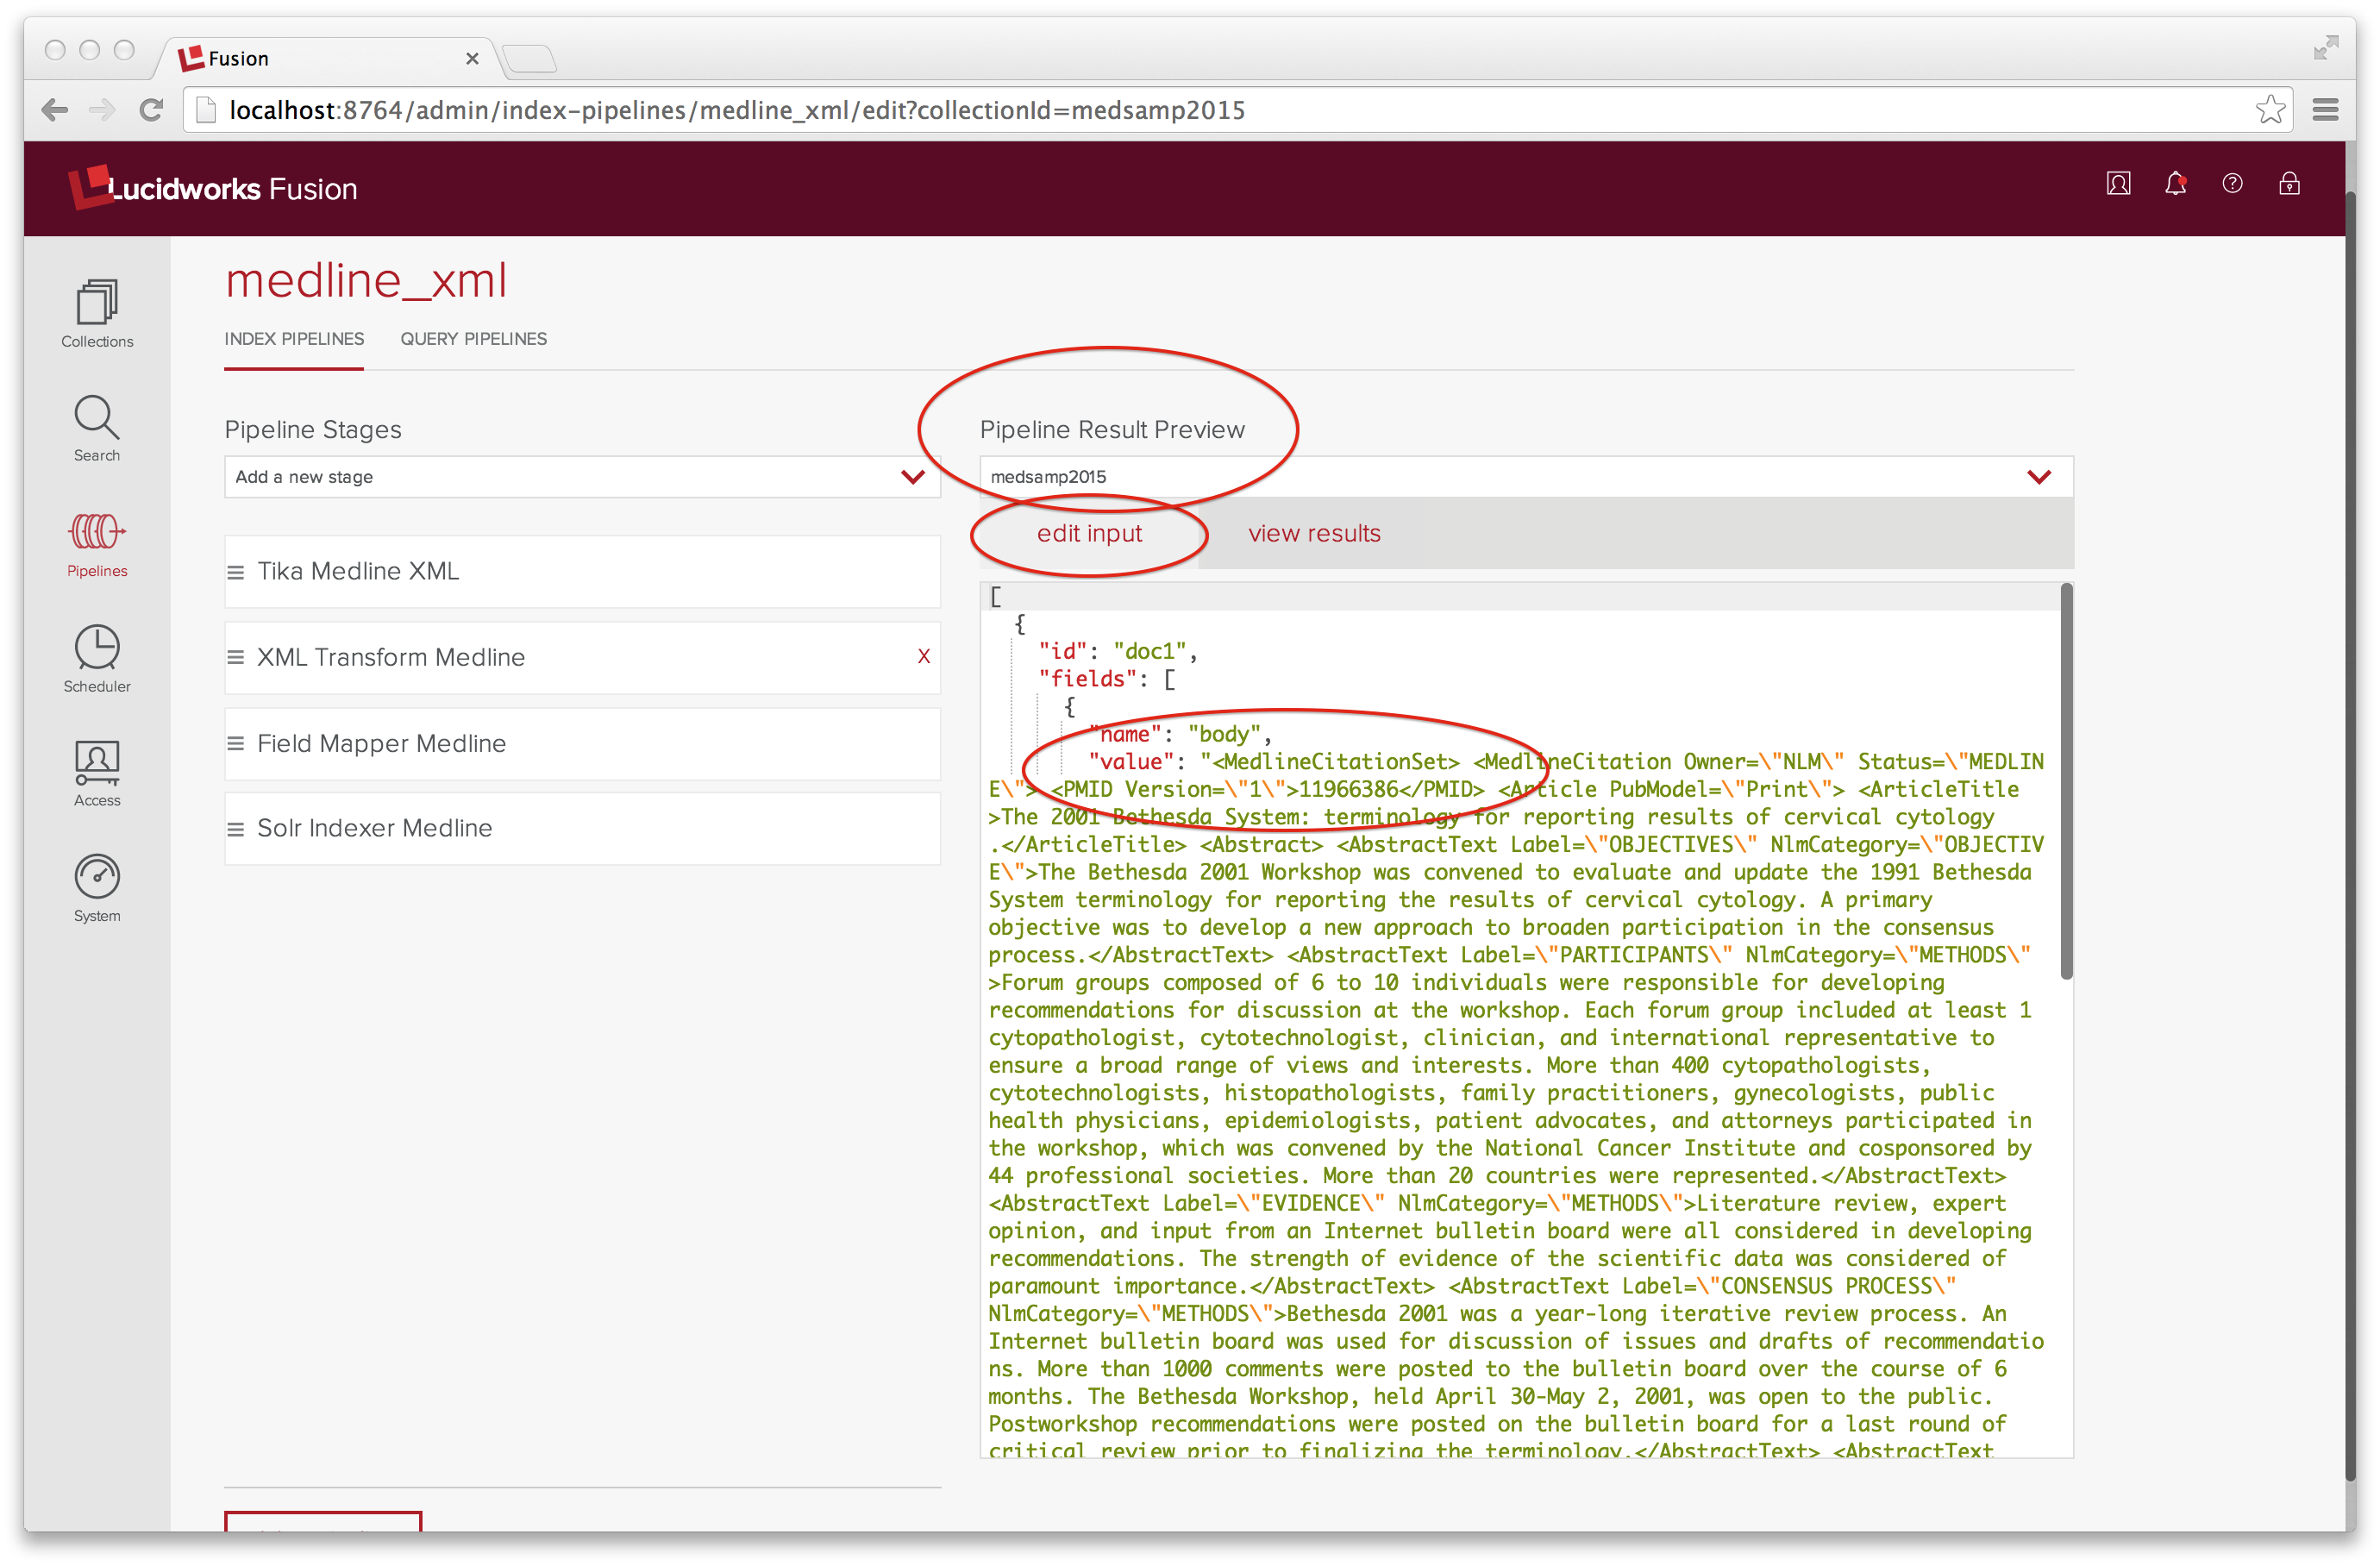
Checking Configuration with the Pipeline Result Preview Tool
This is a lot to configure, and I couldn’t have done it without the “Pipeline Result Preview” tool, located on the right hand side of the Pipeline UI panel. The Preview tool takes as input a list of documents coded up as a JSON objects and runs them through the indexing pipeline. A document object has two members: id and fields. Here, our input has exactly one field, name “body” whose value is a JSON-encoded string of the raw XML (or a subset thereof). The JSON input can’t split strings across lines, which means that the JSON-encoded XML is pretty much unreadable. After several tries, I get a well-formed example MedlineCitationSet example consisting of three MedlineCitation elements, properly escaped for JSON all jammed together on one line.
The “view results” tab shows the result of running this input through the medline_xml indexing pipeline:
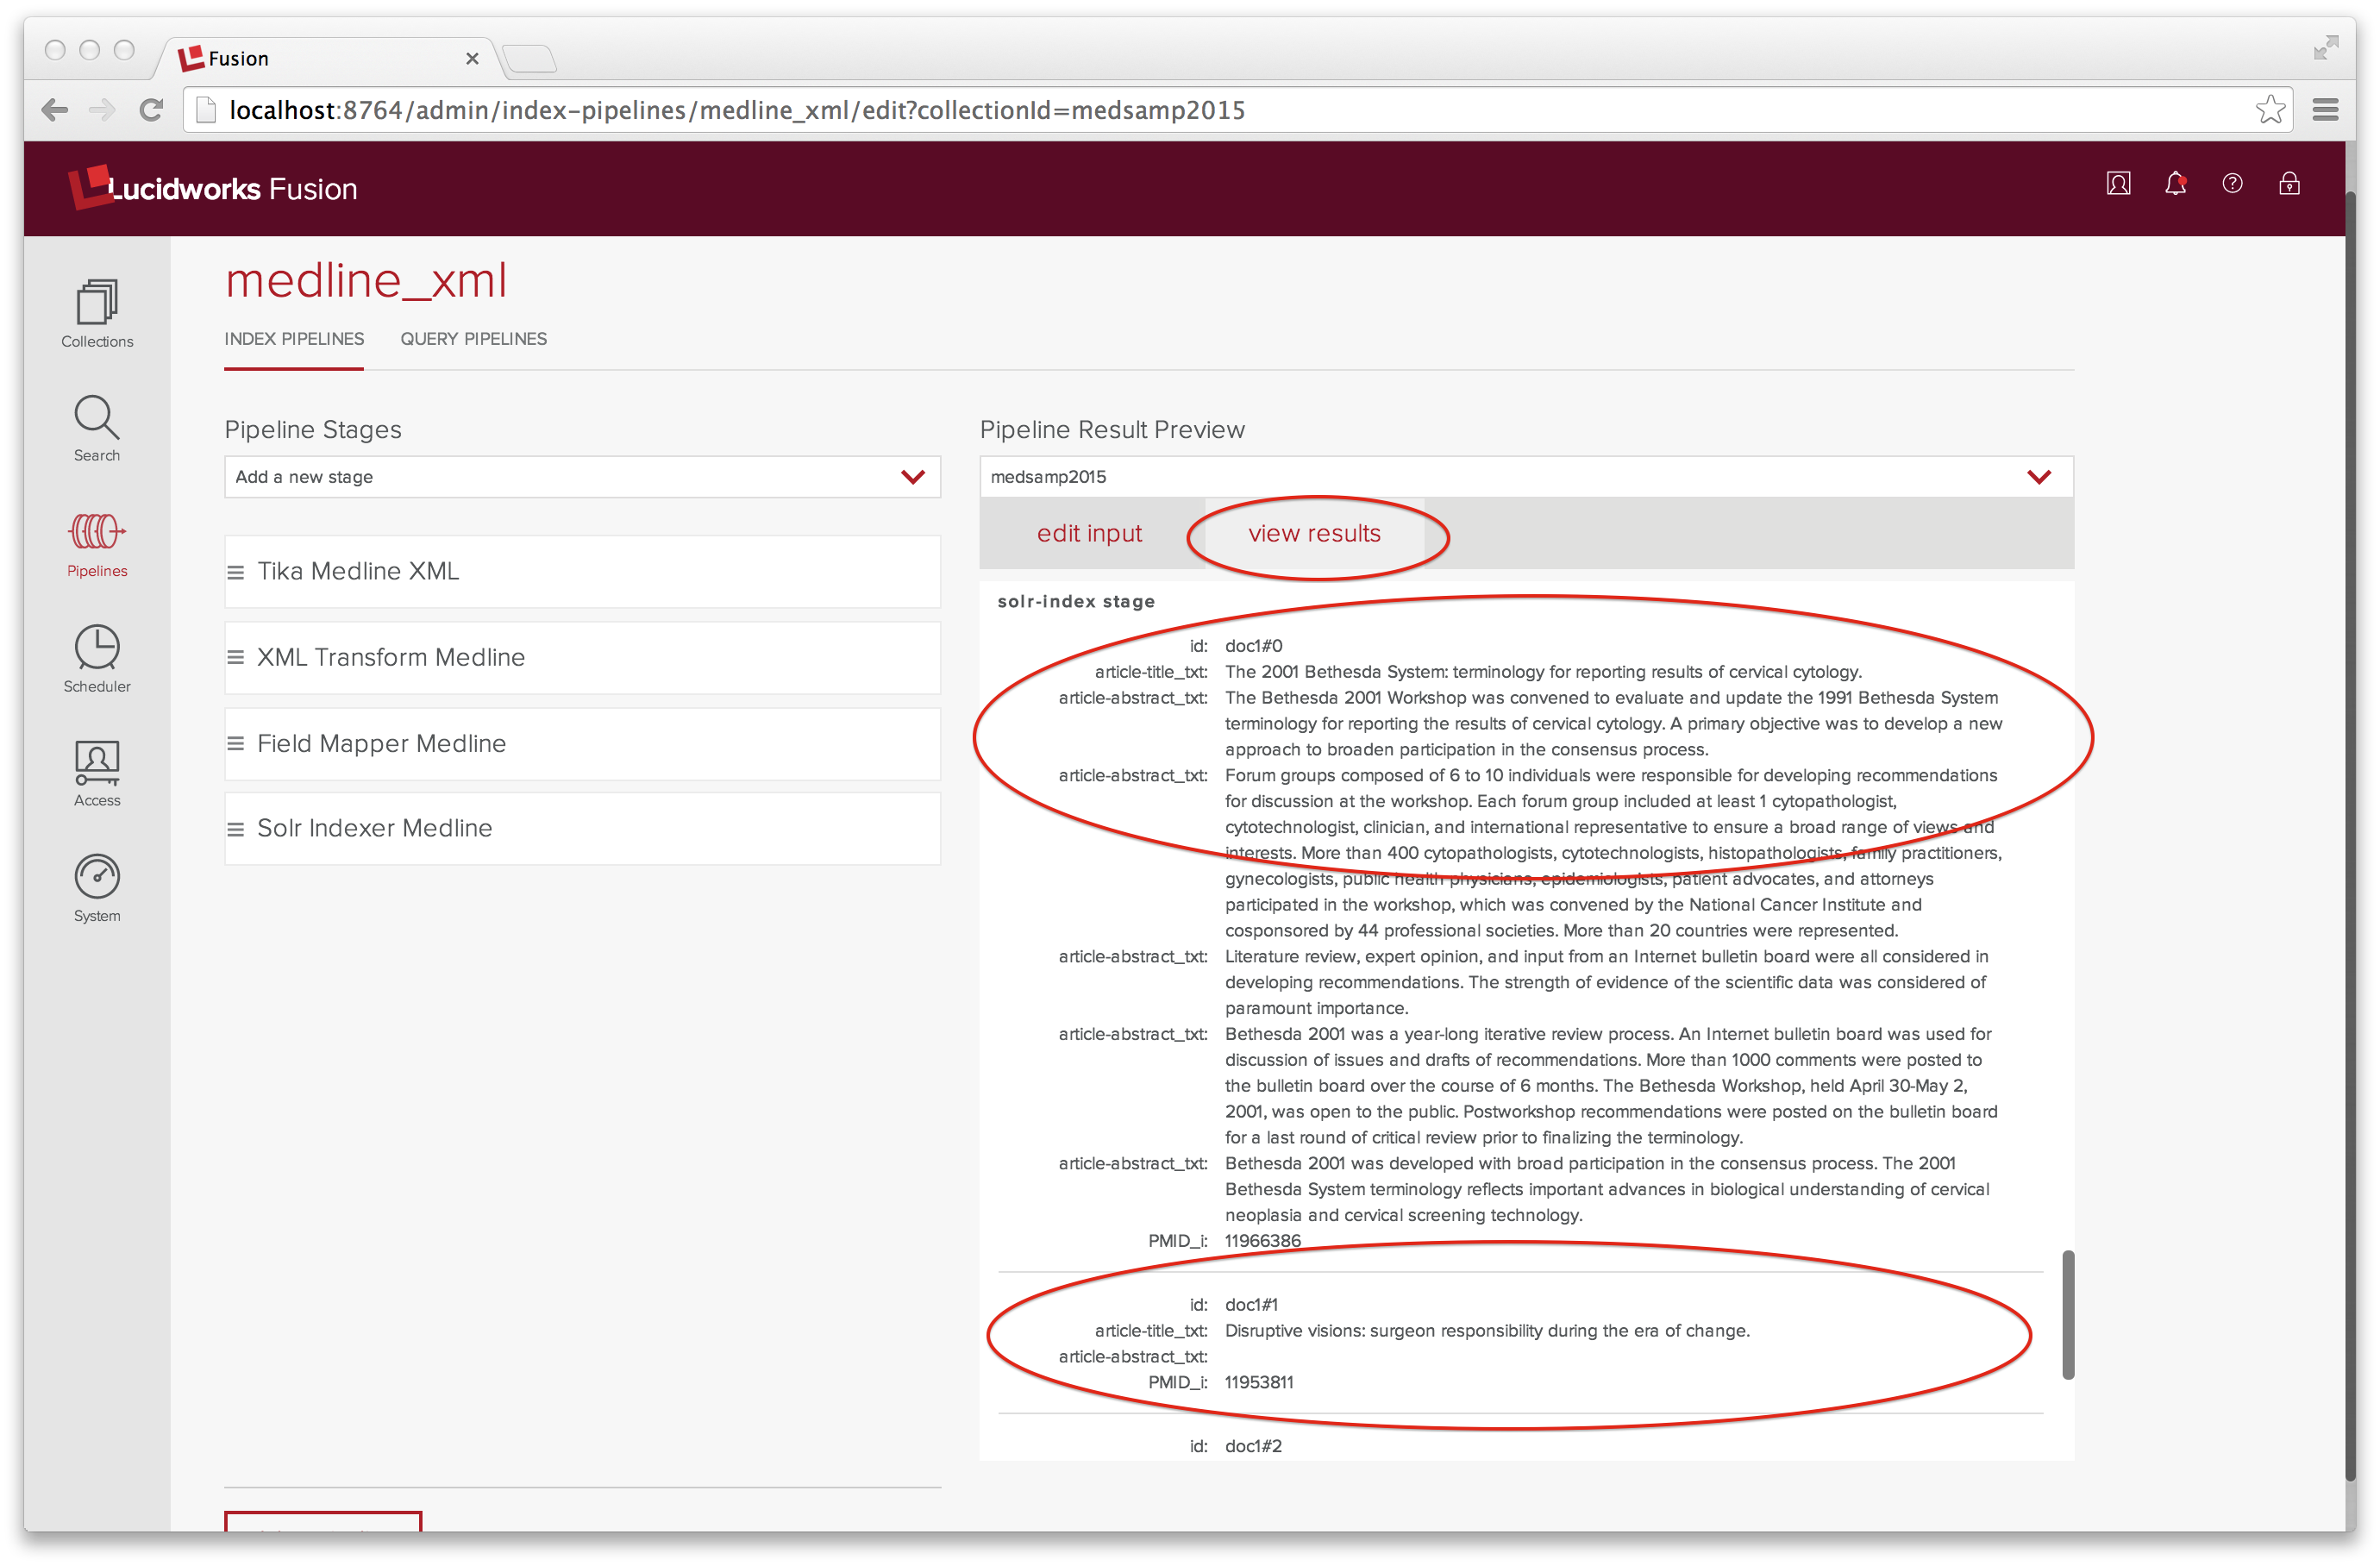
I’ve scrolled down to display the input to the Solr Indexer, which consists of three documents, named doc1#0 through doc1#2.
Indexing
From the Fusion Admin UI, I return to the Collections panel for the collection named medsamp2015. As before, I create a web datasource called medsamp2015xml_v2 and point it at the MEDLINE 2015 sample data file, taking care to specify the medline_xml pipeline in the “Pipeline ID” input box.

One input was processed and the index now contains 165 documents. I have managed to index fresh content!
Search and Results
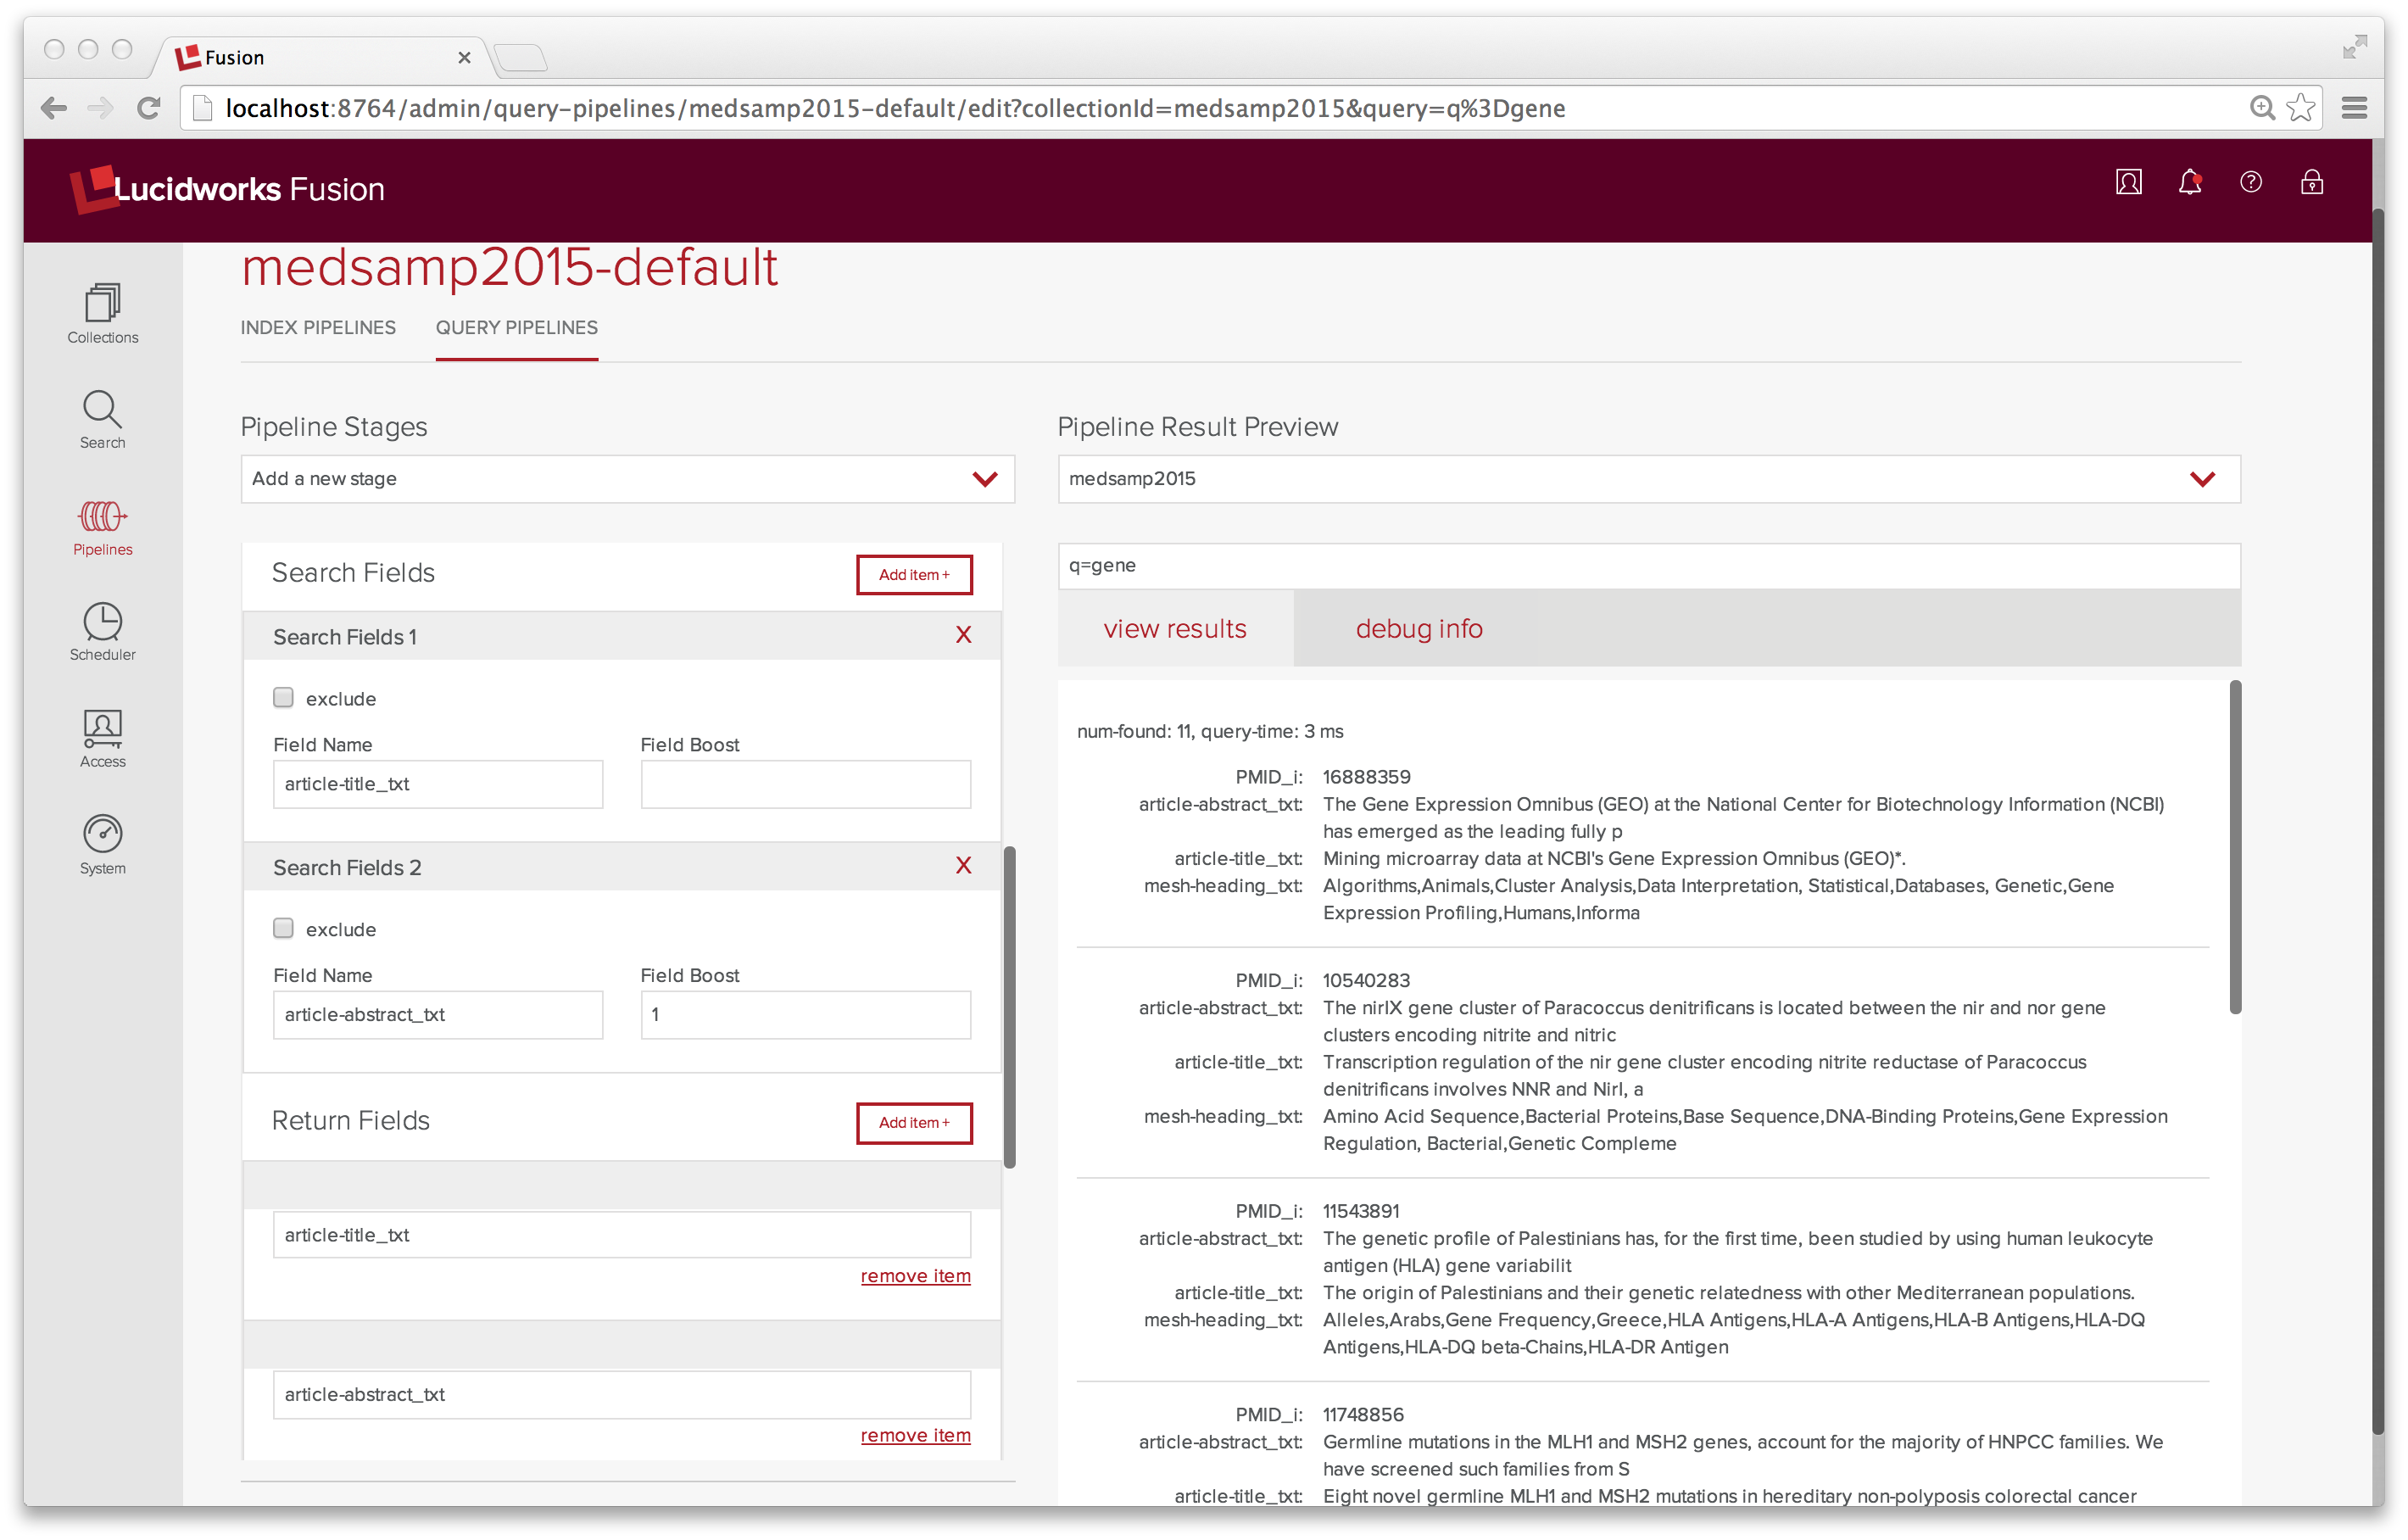
As a first test, I do a keyword search on the word “gene”. This search returns no documents. I do a keyword search on “*”. This search returns 165 documents, the very first of which contains the word “gene” in both the article title and the article abstract. Again, the problem lies with the pipeline I’m using. The default query pipeline doesn’t search the fields “article-title_txt”, “article-abstract_txt”, or “mesh-heading_txt”.
Tuning the search query parameters is done with Query Pipeline control panel. After changing the set of search fields and return fields in the “medsamp2015-default” to include these fields, I run a few more test queries. Now a search on “gene” returns 11 results and returns only the relevant fields.
In conclusion, I’ve managed use Fusion Admin UI to search and index my data. I didn’t get the Enterprise up to warp speed. Maybe next week. In the meantime, I’ve learned a lot and I hope that you have too.
*dare to learn new things, dare to be a noob