Solr Shines Through the Cloud – Lucidworks Solr on EC2
Overview
Lucidworks has now packaged the latest version of our Lucidworks Search as an Amazon Machine Instance (AMI). It’s available for free to anyone with an Amazon Web Services account and Amazon EC2 access. In this post, I’ll outline what this is about, what it can do for you and instructions on how to get it started.
Our free AMI running Lucidworks for Solr offers the following benefits:
- A very straightforward way to get a Solr instance up and running for those who are new to Solr and want to try it for the first time.
- An easy way to test out the Lucidworks certified distribution of Solr.
- A convenient starting point with a machine instance that can be used by anyone interested in running Solr in the cloud.
The AMI we’ve provided is a very basic Solr instance using the default example configuration files that Solr includes as a starting place for new users, along with a set of nineteen documents indexed and ready for searching. If you are interested in building Solr instances in the cloud this AMI is a good place to begin: simply edit the configuration files for your needs, set up persistent storage with Amazon EBS or S3 for your indexes, and you have a machine instance that can be bundled and registered for your own use.
Amazon EC2
Amazon Elastic Compute Cloud (Amazon EC2) is a web service that provides resizable compute capacity in the cloud. Cloud computing is a way to offer internet-based services, sometimes categorized into the following descriptions: Infrastructure-as-a-Service (IaaS), Platform-as-a-Service (PaaS) and Software-as-a-Service (SaaS). Services are sold on demand and a consumer is charged by the hour for the services that they use. EC2 is one of the most popular cloud computing providers.
Running Lucidworks for Solr on Amazon EC2 requires that you have an account on Amazon Web Services, and that you are somewhat familiar with how to deploy an Amazon Machine Instance, but we’ll describe the process in detail, step-by-step to get you up and running easily.
These instructions assume you are already familiar with running machine instances in EC2. We provide detailed instructions on how to get the Lucidworks instance up and running, but this is not a tutorial on how to use EC2 if you are not already familiar with it. If you do not yet have an Amazon Web Services account, and are unfamiliar with EC2, here is a link to an introduction on how to get started. Once you have an account and are comfortable working with the EC2 tools, you’ll be ready to proceed to the next steps in this guide.
Lucidworks for Solr version 1.4, as you may already know, is a comprehensive, tested and release-stable certified distribution of Apache Solr, available for free. Lucidworks for Solr offers:
- A solid foundation of reliability and consistency for production-grade use of open source
- Fast, convenient access to documentation needed to build better search applications faster
- Quick, simplified setup and maintenance of Solr and its constituent components
Running Lucidworks for Solr on EC2 is possibly the easiest and fastest way to get a Solr instance up and running.
Steps to Run Lucidworks for Solr on Amazon EC2
OK, let’s create an instance of the Lucidworks for Solr AMI. We’ll show how to do this using the AWS Management Console. You could also use Elasticfox, a Mozilla Firefox extension for managing your Amazon EC2 account. If you are experienced with Elasticfox the steps will be similar to these and should be familiar to you.
AWS Management Console Instructions
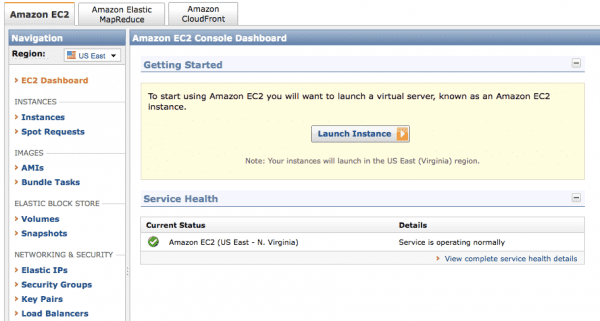
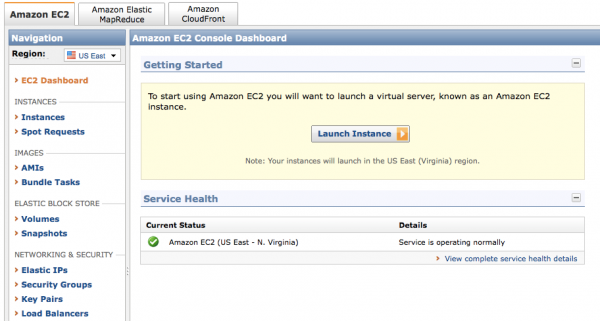
Log into your AWS account. You should be at the start location for the Management Console:
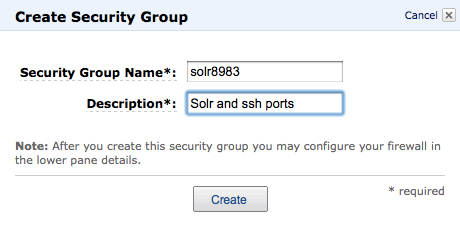
Before we launch the Lucidworks AMI we’ll need to first set up some security settings to allow access to two ports on the instance: 8983 for Solr, and 22 for ssh.
From the AWS Management Console under the Network & Security Settings section click on the “Security Groups” link, and from the Security page click on the “Create Security Group” button, and then enter the following values:
At the bottom of the security page you will need to set up and save two connection methods, one for SSH, the other a “Custom” connection for the Solr port:

We’ll use that new security group when we launch an instance of the Lucidworks AMI.
Now click on the “AMIs” link under the Images section. In the “Viewing” drop down box select “Public Images”, and in the input box enter “lucidworks”. You should see one machine image available:

Check the checkbox to the left and click on the “Launch” button above it.
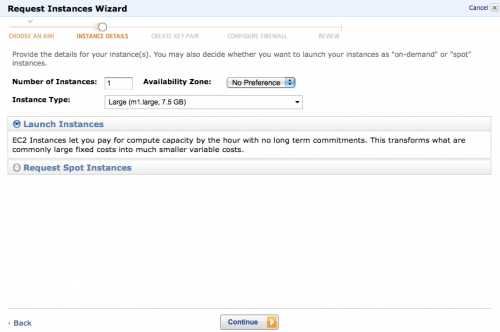
Select the options for number of instances, machine size, and availability zone. The defaults are fine to get started.
On the second page just take the default values presented:

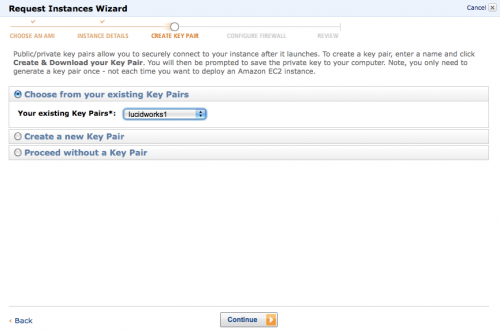
On the third page select your key pairs, which you should already have set up:
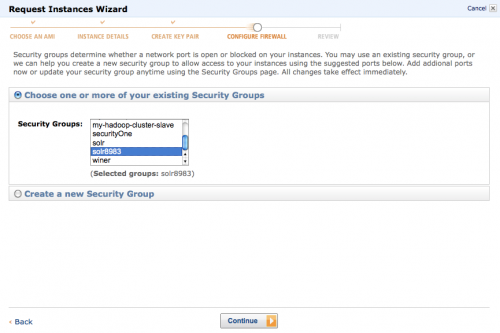
On the next page you’re asked to select the security groups to enable. Select the solr8983 group that we configured earlier. This will allow connections to port 8983 for Solr and port 22 for ssh:
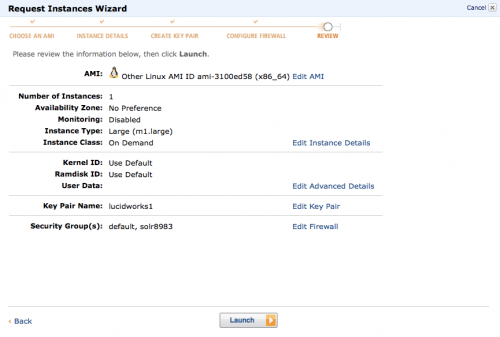
Finally you’re asked to review your settings. If everything looks good go ahead and click the “Launch” button:
You should see a confirmation that the instance is launching:
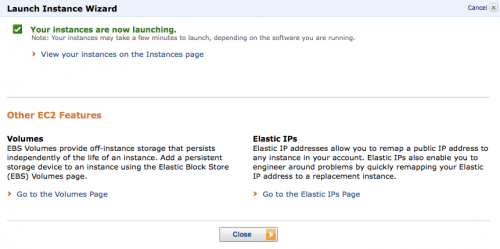
Now you’re instance should be starting up. Back at the main AWS Management Console page click on the “Instances” link in the Instances section:

It will take a few minutes for the instance to launch. Reload the page until the Status changes from “pending” to “running”. Once the Status shows the instance is “running” you should be able to connect to the Solr Admin Console. You’ll need to know the public DNS of your instance. With the checkbox checked on this instance there will be a few lines of status output at the bottom of the AWS Management Console that look this:

Use the public DNS to build the URL to access the Solr Admin Console: http://ec2-174-129-150-181.compute-1.amazonaws.com:8983/solr/admin/

Now you’ve got a Solr instance up and running with nineteen sample documents in the index. If you’re new to Solr make sure to download Lucid Imagination’s free reference guide as a good start to learning about Solr.
Final Step: Logging into the Instance to Stop and Start Lucidworks for Solr
With the instance now up and running you may want to make changes, index more content, etc. You’ll need to ssh into the machine instance to do these tasks. From the AWS Management Console select the machine instance and find the “Instance Actions” list. From that list select the “Connect” option:

You should see instructions for connecting to your instance via ssh:

Once you have successfully logged into the instance you will find the Lucidworks for Solr home directory here: /opt/Lucidworks. Within that directory there is a “start” and a “stop” script for stopping and starting Solr if you make changes to the schema.xml or solrconfig.xml files. The Solr home directory is /opt/Lucidworks/lucidworks/solr and the index directory is /opt/Lucidworks/lucidworks/solr/data/index.
The instance is configured to start up with the following heap size settings: -Xms1g -Xmx3g. These are set in the Tomcat start script that manages Lucidworks: /opt/Lucidworks/lucidworks/tomcat/bin/catalina.sh
Note that the machine instance does not have any persistent storage, so if you want to start working with your own data and creating indexes that persist, you will need to use the Lucidworks AMI as a starting point, and you will have to add permanent storage, either Amazon EBS or Amazon S3.
Hopefully this has given you a chance to experience Solr running in the cloud, and shown some of the basics you’ll need to build on to implement cloud-hosted distributed search with Lucidworks for Solr.
LEARN MORE
Contact us today to learn how Lucidworks can help your team create powerful search and discovery applications for your customers and employees.