Secure Fusion: Leveraging LDAP

This is the third in a series of articles on securing your data in Lucidworks Fusion. Secure Fusion: SSL Configuration covers transport layer security and Secure Fusion: Authentication and Authorization covers general application-level security mechanisms in Fusion. This article shows you how Fusion can be configured to use an LDAP server for authentication and authorization.
Before discussing how to configure Fusion for LDAP, it’s important to understand when and why to do this. Given that Fusion’s native security realm can manage authentication and passwords directly, why bother to use LDAP? And conversely, if you can use LDAP for authentication and authorization, why not always use LDAP?
The answer to the latter question is that Fusion’s native security realm is necessary to bootstrap Fusion. Because all requests to Fusion require authentication and authorization, you must start building a Fusion application by first logging in as the native user named “admin”. Built-in authentication provides a fallback mechanism in case of LDAP server or communication failure.
Why use LDAP? Using LDAP simplifies the task of user administration. Individual user accounts are managed directly by LDAP. Access to services and data is managed by mapping LDAP users and groups to Fusion roles and permissions.
A common use case for an LDAP security realm is for search over a collection of documents with ACLs that restrict access to specific users or groups, e.g. indexing a MS Sharepoint repository managed by Active Directory. In order to make sure that search respects the access permissions on these documents, when indexing those documents, you must the access permissions as well as the document contents. At query time, the user account information sent along with the search query and Fusion restricts the search results set to only those documents that the user is allowed to access.
LDAP for Noobs
If you understand LDAP and are comfortable configuring LDAP-based systems, you can skip this section and go to section Fusion Configuration.
The LDAP protocol is used to share information about users, systems, networks, and services between servers on the internet. LDAP servers are used as a central store for usernames, passwords, and user and group permissions. Applications and services use the LDAP protocol to send user login and password information to the LDAP server. The server performs name lookup and password validation. LDAP servers also store Access Control Lists (ACLs) for file and directory objects which specify the users and groups and kinds of access allowed for those objects.
LDAP is an open standard protocol and there are many commercial and open-source LDAP servers available. Microsoft environments generally use Active Directory. *nix servers use AD or other LDAP systems such as OpenLDAP, although many *nix systems don’t use LDAP at all. To configure Fusion for LDAP, you’ll need to get information about the LDAP server(s) running on your system either from your sysadmin or via system utilities.
Directories and Distinguished Names
An LDAP information store is a Directory Information Tree (DIT). The tree is composed of entry nodes; each node has a single parent and zero or more child nodes. Every node must have at least one attribute which uniquely distinguishes it from its siblings which is used as the node’s Relative Distinguished Name (RDN). A node’s Distinguished Name (DN) is a globally unique identifier.
The string representation of a DN is specified in RFC 4514. It consists of the node’s RDN followed by a comma, followed by the parent node’s DN. The string representation of the RDN is the attribute-value pair name, connected by an equals (“=”) sign. This recursive definition means that the DN of a node is composed by working from the node back through its parent and ancestor nodes up to the root node.
Here is a small example of a DIT:
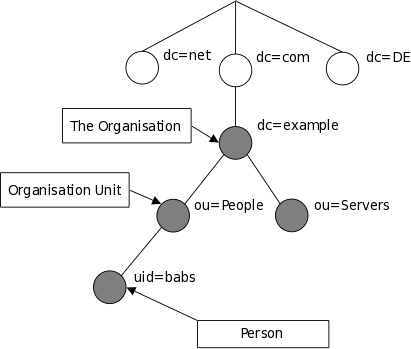
The person entry in this tree has the DN: “uid=babs, ou=people, dc=example, dc=com”.
Attribute names include many short strings based on English words and abbreviations, e.g.:
| Name | Description |
|---|---|
|
cn |
commonName |
|
dc |
domainComponent |
|
|
email address |
|
ou |
organizationalUnitName |
|
sn |
surname |
|
uid |
userId |
LDAP entry attributes can refer to other LDAP entries by using the DN of the entry as value of that attribute. The following example of a directory which contains user and groups information shows how this works:
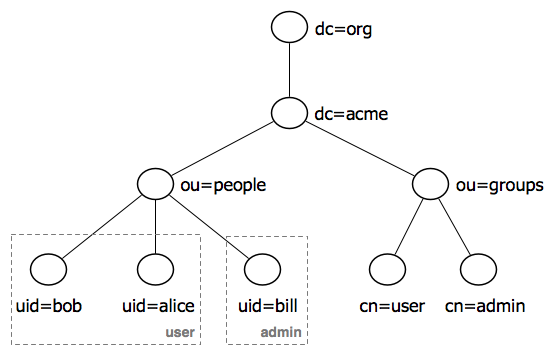
This tree contains two organizational units: “ou=people” and “ou=groups”. The children of the “group” organizational unit are specific named groups, just as the child nodes of organization unit “people” are specific users. There are three user entries with RDNs “uid=bob”, “uid=alice”, “uid=bill” and two groups with RDNs “cn=user” and “cn=admin”. The dotted lines and group labels around the person nodes indicates group membership. This relationship is declared on the groups nodes by adding an attributes named “member” whose value is a users DN. In the LDAP data interchange format (LDIF), this is written:
cn=user,ou=groups,dc=acme,dc=org
    member: uid=bob,ou=people,dc=acme,dc=org
    member: uid=alice,ou=people,dc=acme,dc=org
cn=admin,ou=groups,dc=acme,dc=org
    member: uid=bill,ou=people,dc=acme,dc=org
See the Wikipedia’s LDAP entry for details.
LDAP Protocol Operations
For authentication purposes, Fusion sends Bind operation requests to the LDAP server. The Bind operation authenticates clients (and the users or applications behind them) to the directory server, establishes authorization identity used for subsequent operations on that connection, and specifies the LDAP protocol version that the client will use.
Depending on the way that the host system uses LDAP to store login information about users and groups, it may be necessary to send Search operation requests to the LDAP server as well. The Search operation retrieves partial or complete copies of entries matching a given set of criteria.
LDAP filters specify which entries should be returned. These are specified using prefix notation. Boolean operators are “&” for logical AND, “|” for logical OR, e.g., “A AND B” is written “(&(A)(B))”. To tune and test search filters for a *nix-based LDAP system, see the ldapsearch command line utility documentation. For Active Directory systems, see AD Syntax Filters.
Fusion Configuration for an LDAP Realm
To configure Fusion for LDAP, you’ll need to get information about the LDAP server(s) running on your system, either from your system or your sysadmin.
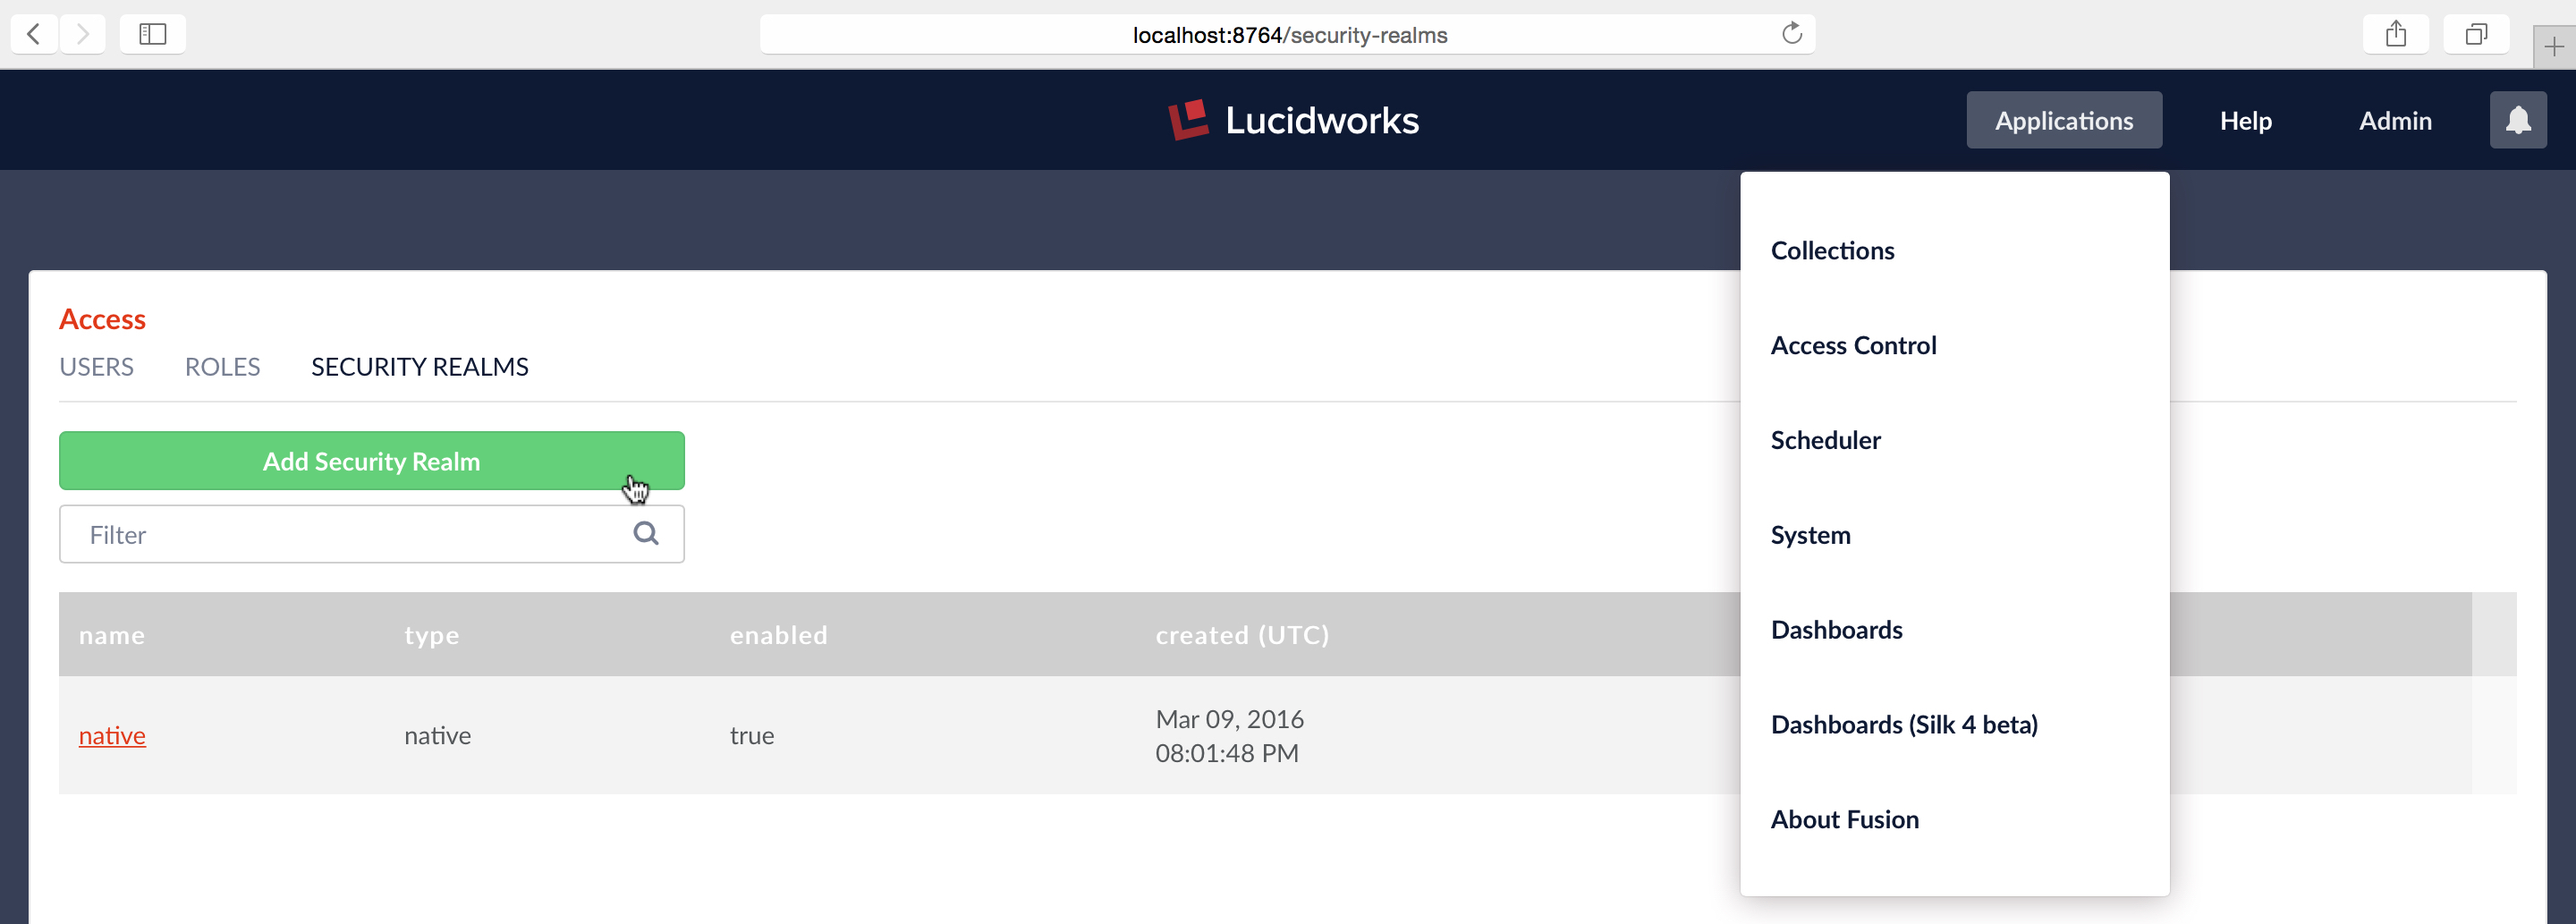
To configure an LDAP realm from the Fusion UI, you must be logged in as a user with admin-level privileges. From the “Applications” menu, menu item “Access Control”, panel “Security Realms”, click on the “Add Security Realm” button:
This opens an editor panel for a new Security Realm, containing controls and inputs for all required and optional configuration information.
Required Configuration Step One: Name and Type
The first step in setting up an LDAP security realm is filling out the required information at the top of the realm config panel:
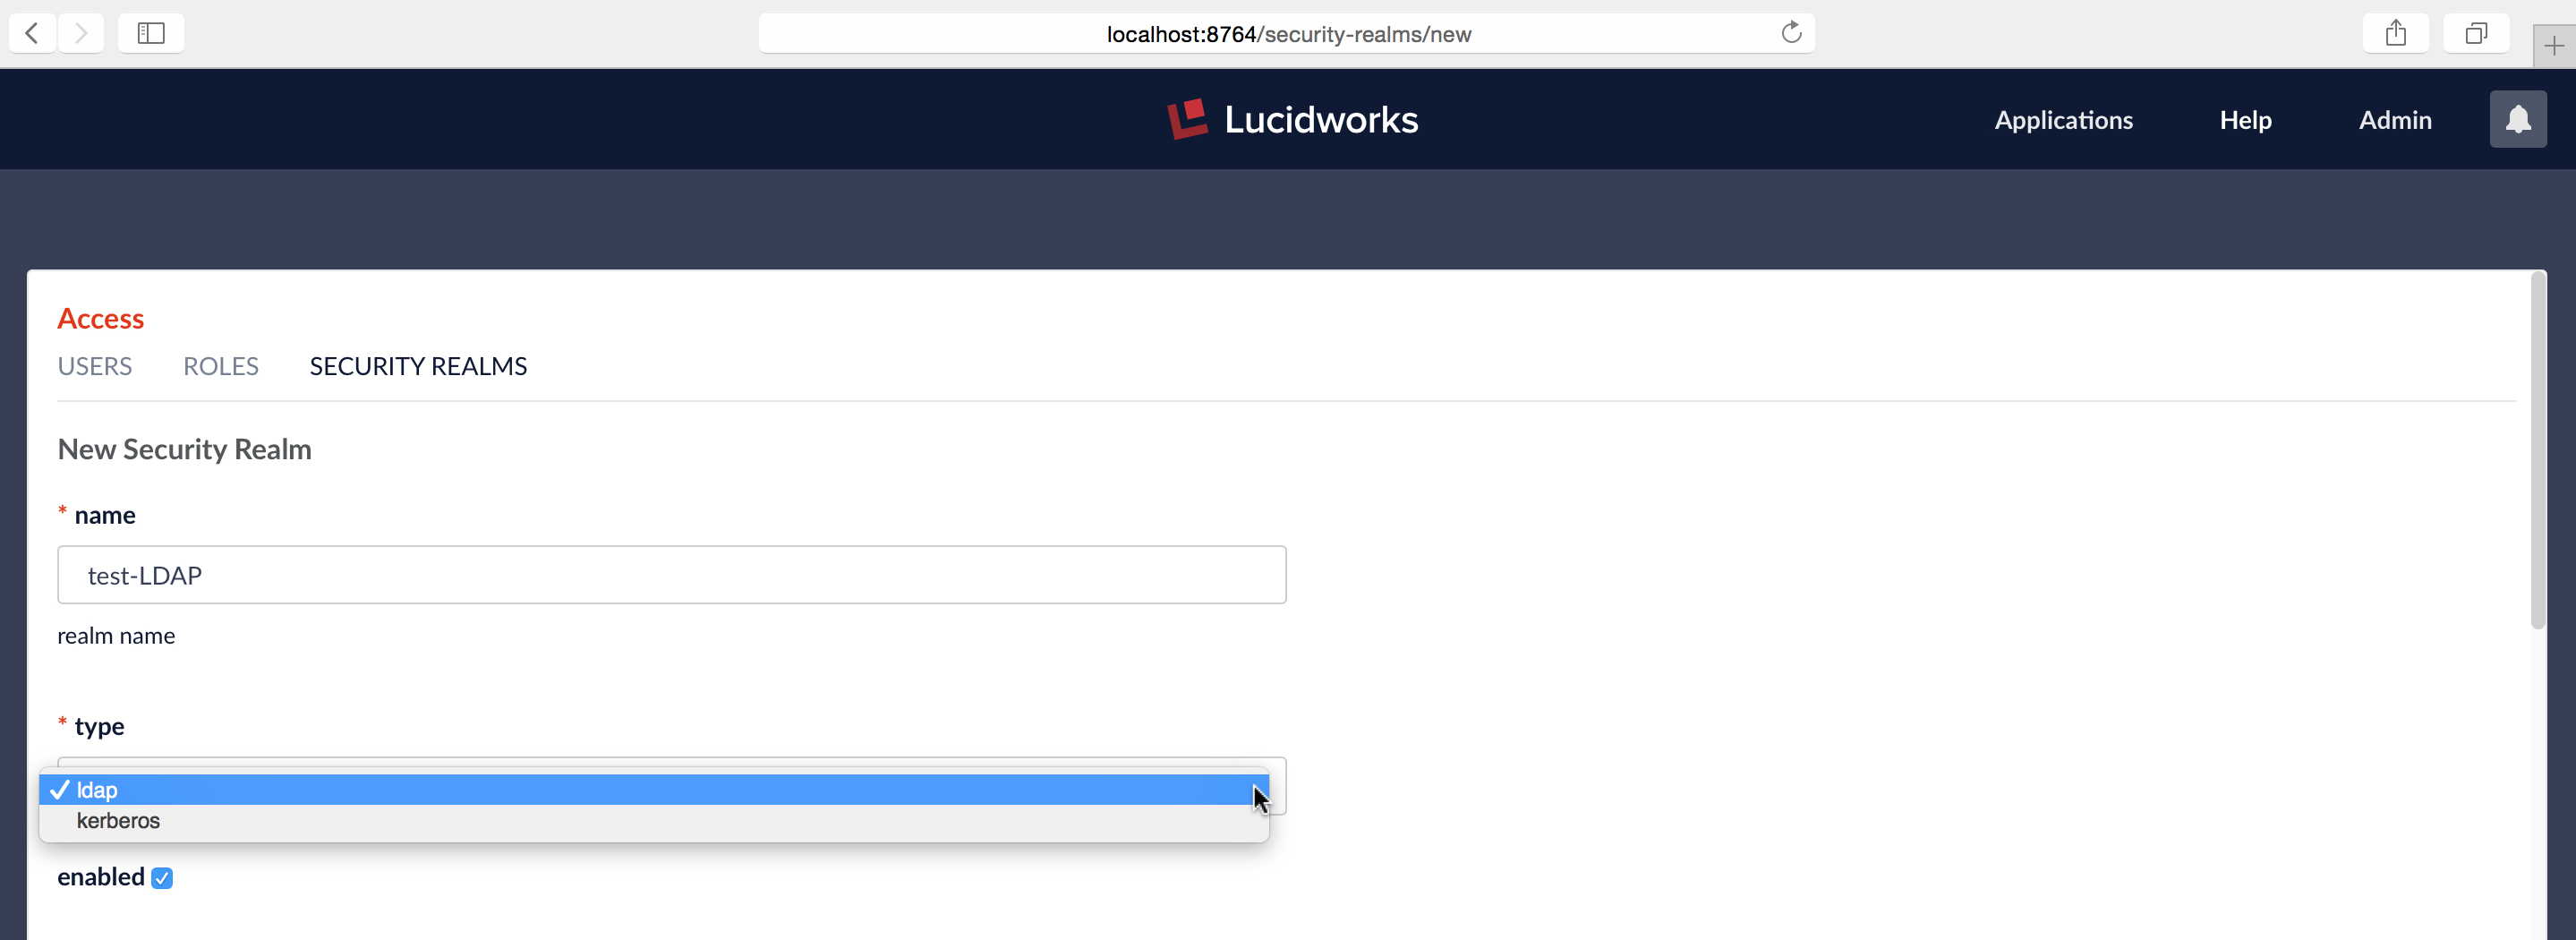
The first three required configuration items are:
- name – must be unique, should be descriptive yet short
- type – choice of “LDAP” or “Kerberos”
- “enabled” checkbox – default is true (i.e., the box is checked). The “enabled” setting controls whether or not Fusion allows user logins for this security realm.
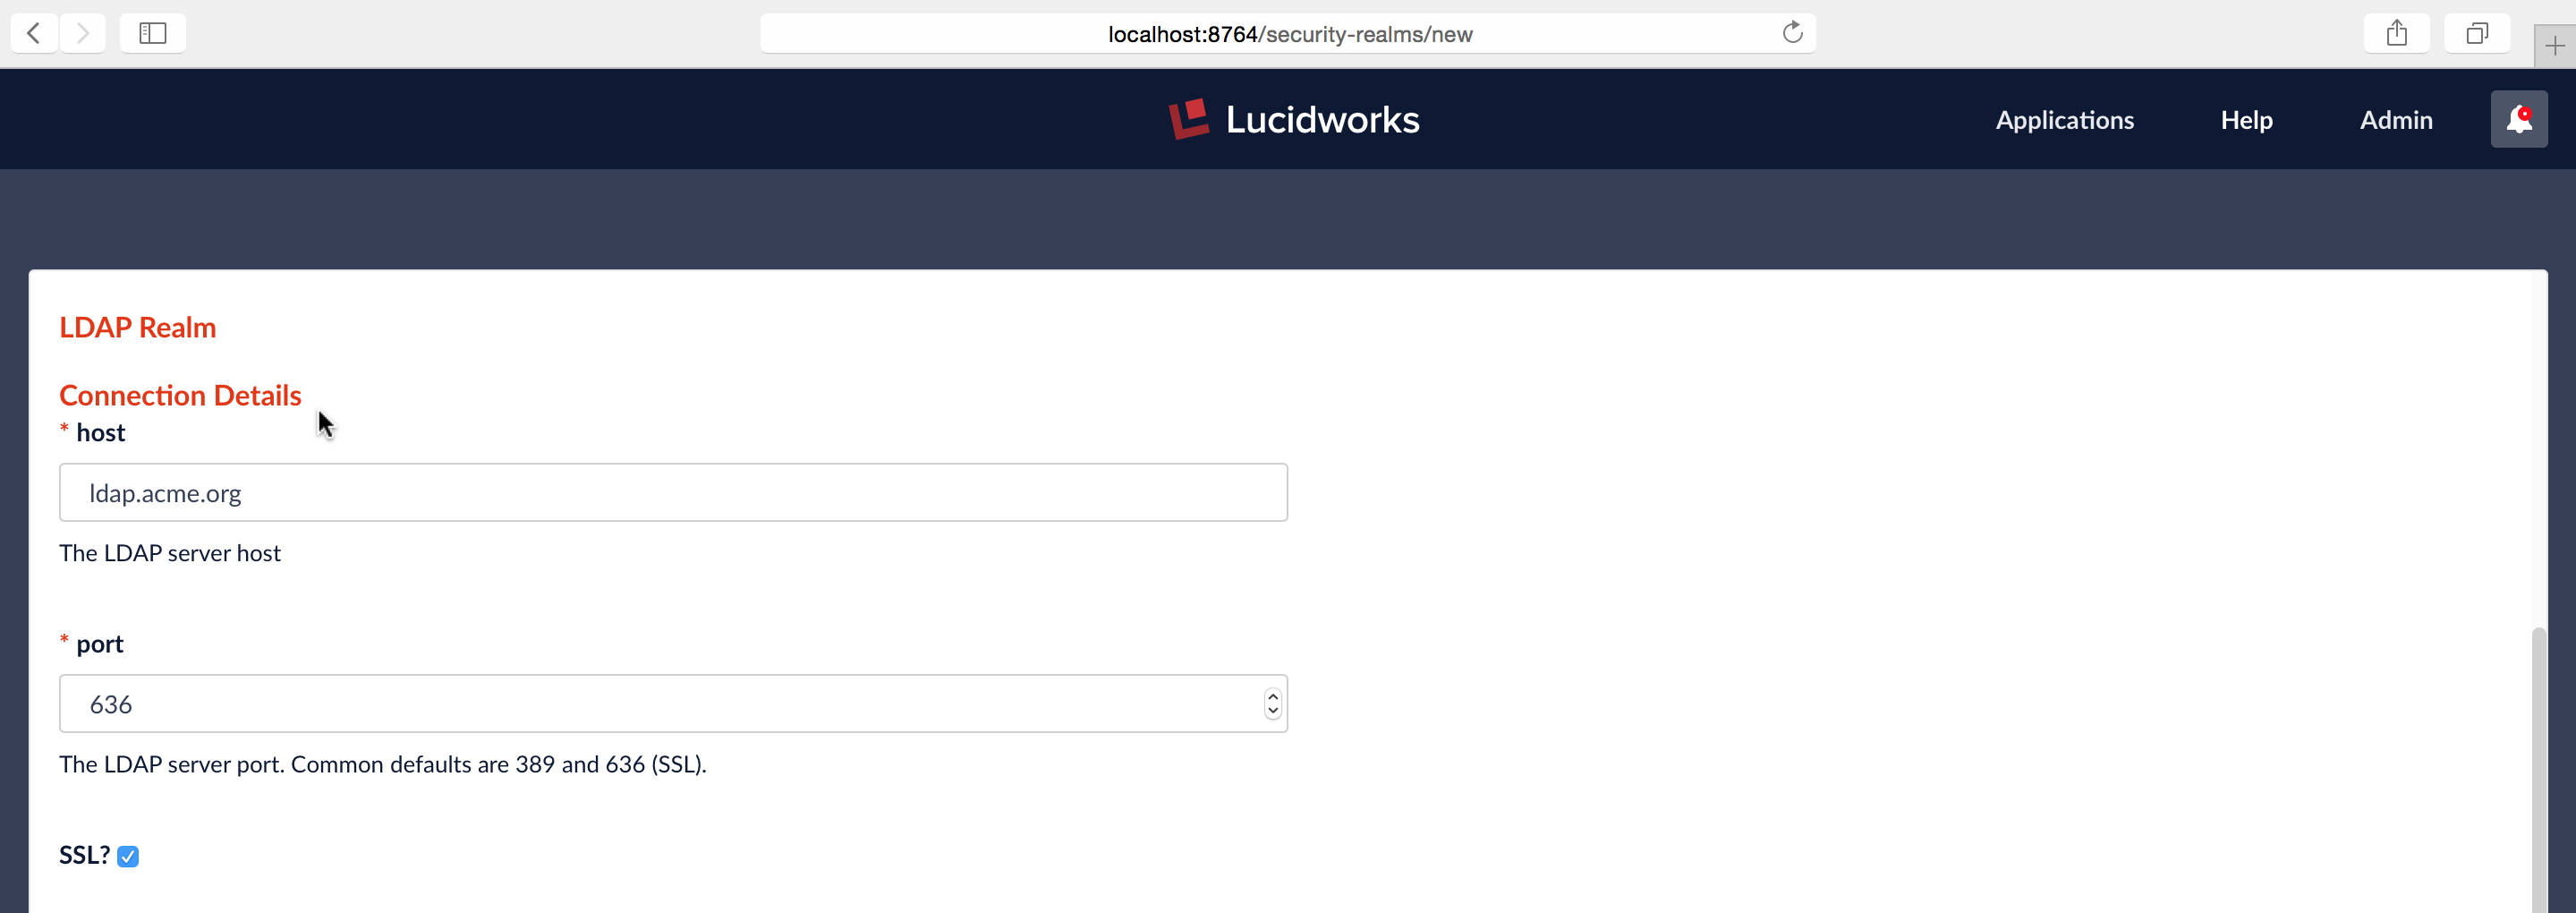
Required Configuration Step Two: Server and Port
The name and port of the LDAP server are required, along with whether or not the server is running over SSL. In this example, I’m configuring a hypothetical LDAP server for company “Acme.org”, running a server named “ldap.acme.org” over SSL, on port 636:
Required Configuration Step Three: Authentication Method and DN Templates
Next, you must specify the authentication method. There are three choices:
- Bind – the LDAP authentication operation is carried out via a single “Bind” operation.
- Search – LDAP authentication is carried out indirectly via a Search operation followed by a Bind operation.
- Kerberos – Kerberos authenticates Fusion and an LDAP Search operation is carried out to find group-level authorizations.
The Bind authentication method is used when the Fusion login username matches a part of the LDAP DN. The rest of the LDAP DN is specified in the “DN Template” configuration entry, which uses a single pair of curly brackets (“{}”) as a placeholder for the value of the Fusion username.
The Search authentication method is used when the username used for Fusion login doesn’t match a part of the LDAP DN. The search request returns a valid user DN, which is used together with the user password for authentication via a Bind request.
The Search authentication method is generally required when working with Microsoft Active Directory servers. In this case, you need to know the username and password of some user who has sufficient privileges to query the LDAP server for user and group memberships; this user doesn’t have to be the superuser. In addition to a privileged user DN and password, the Search authentication method requires crafting a search request. There are two parts to the request: the first part is the base DN of the LDAP directory tree which contains user account objects. The second part of the request is a Search Filter object which restricts the results to a matching subset of the information.
As a simple example, I configure Fusion for acme.org’s Linux-based LDAP server via the Bind authentication method:

In the LDAP directory example for organization “acme.org” above, the DNs for the three nodes in the “people” organizational unit are: “uid=bob,ou=people,dc=acme,dc=org”, “uid=alice,ou=people,dc=acme,dc=org”, and “uid=bill,ou=people,dc=acme,dc=org”. This corresponds to the DN Template string:
uid={},ou=people,dc=acme,dc=org
Testing the Configured Connection
The last part of the form allows you to test the LDAP realm config using a valid username and password:
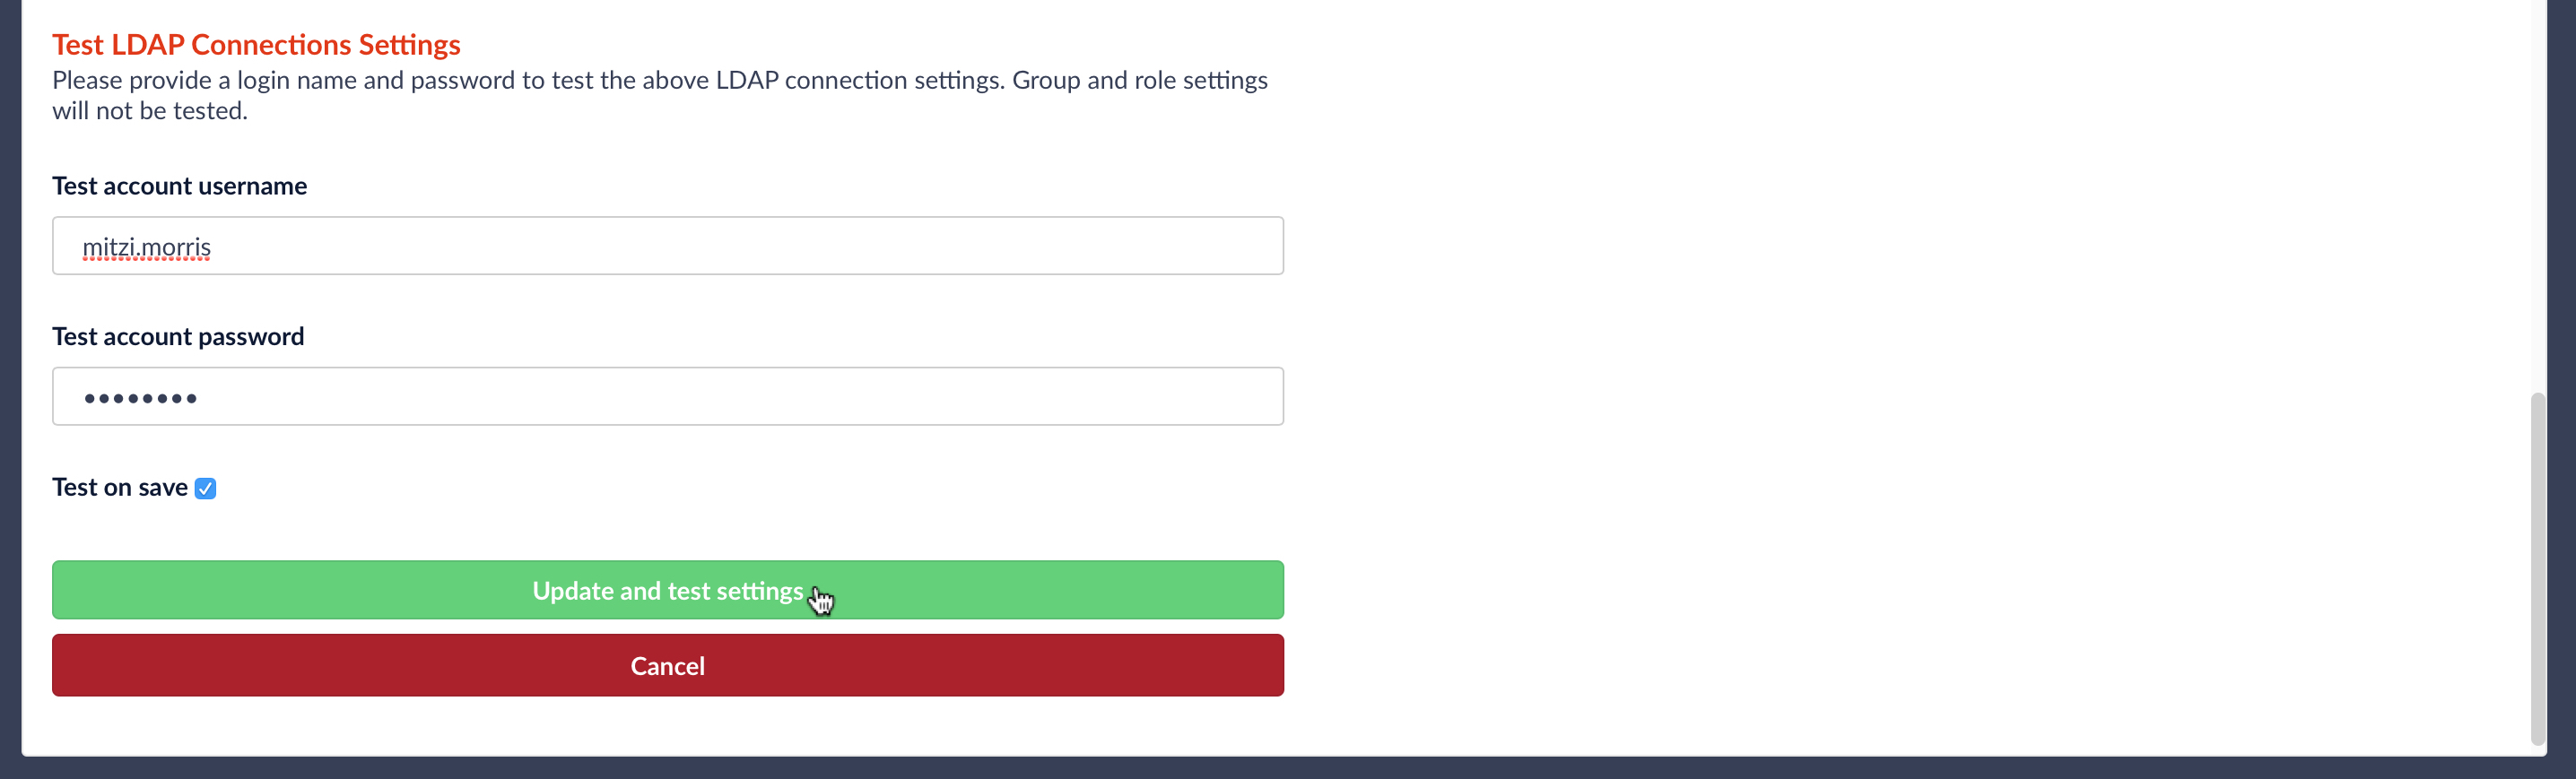
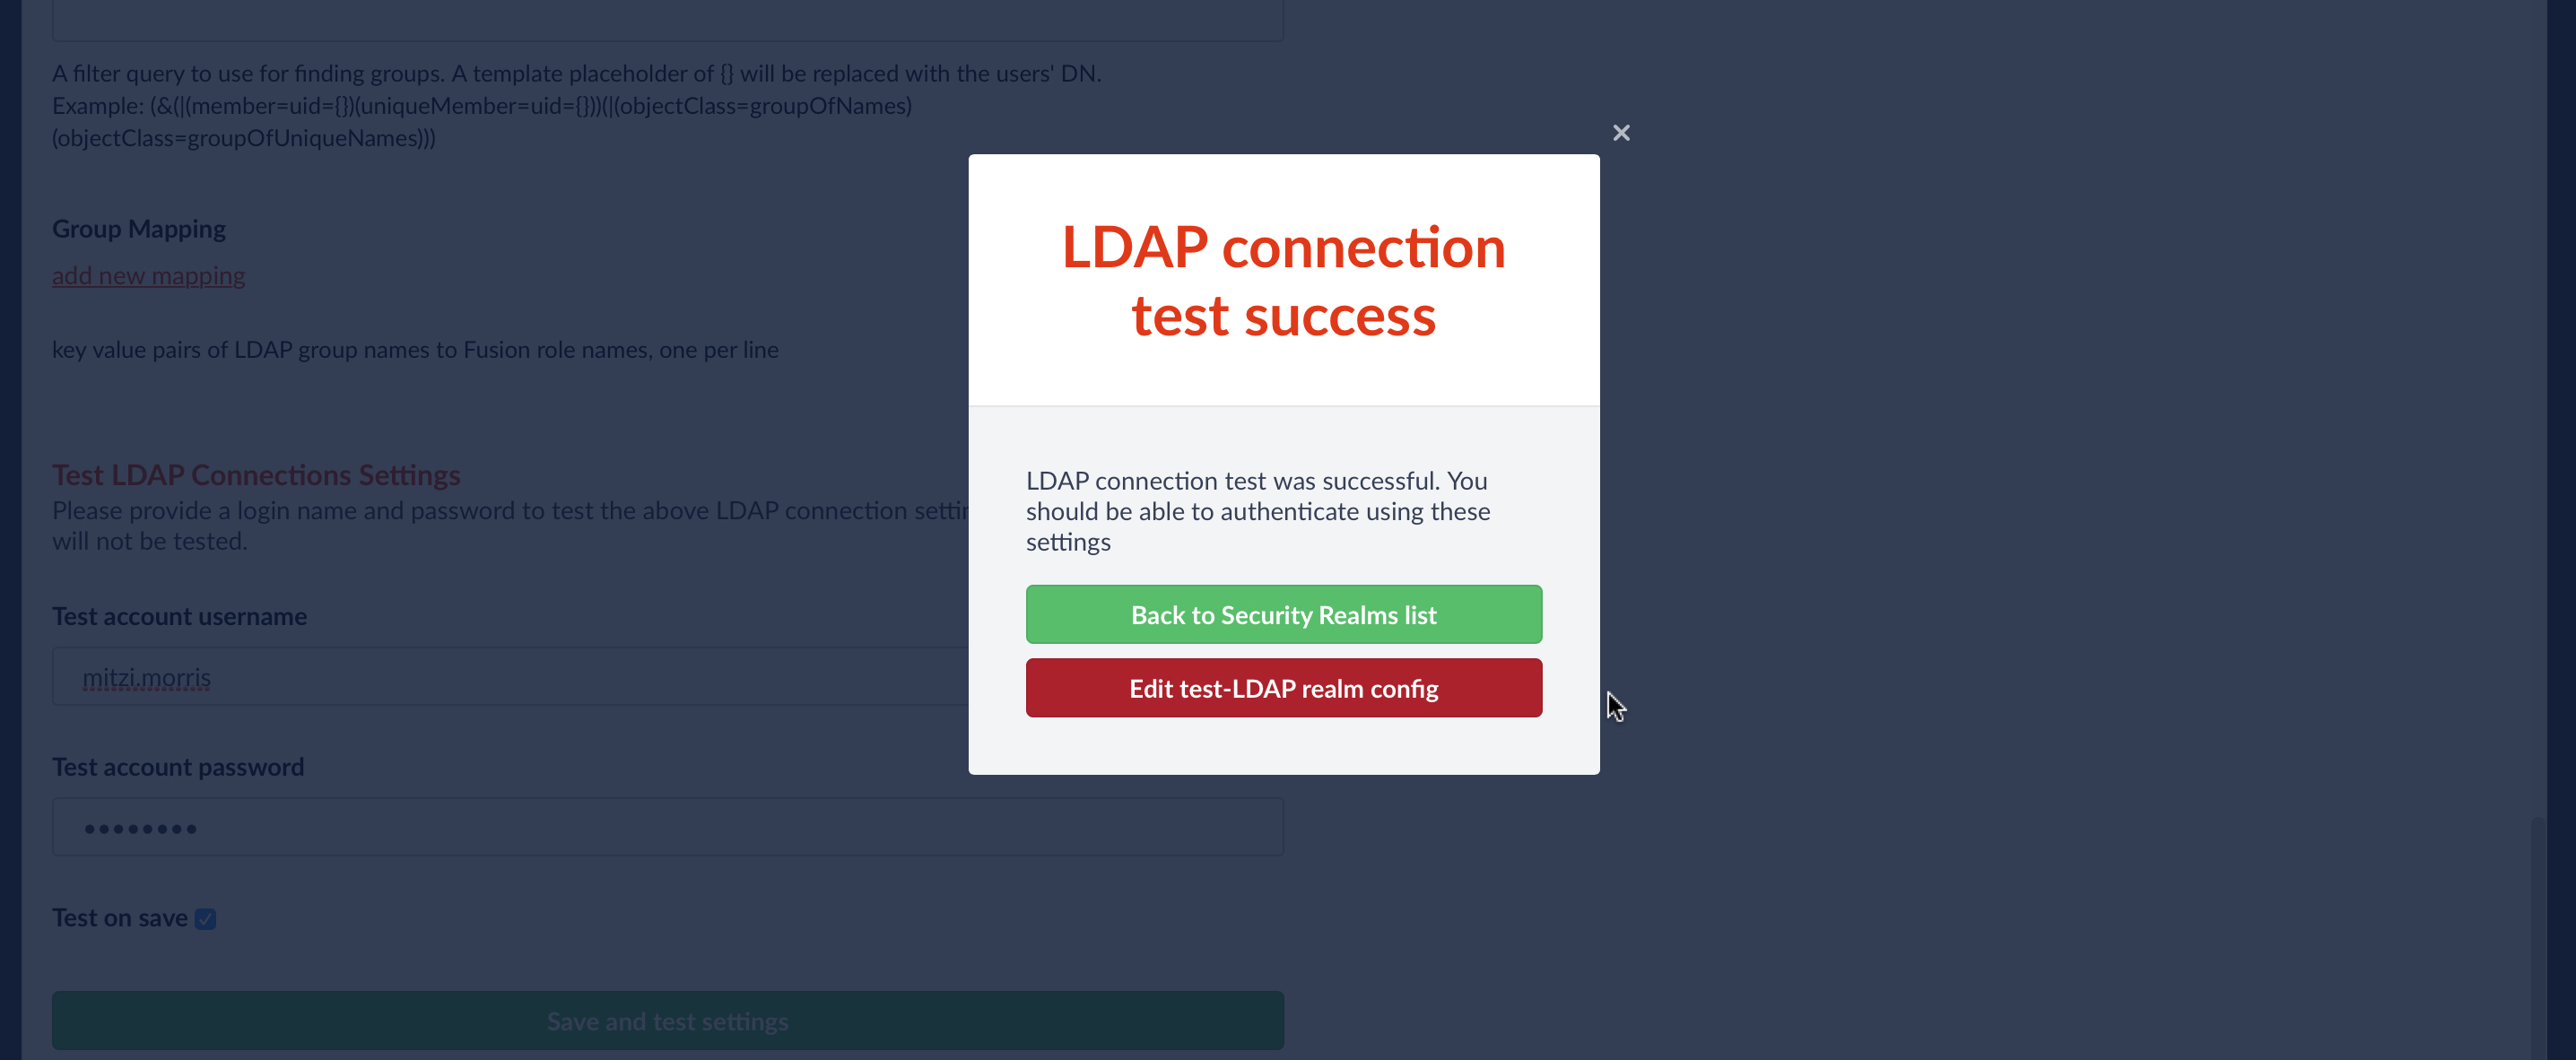
When the “Update and test settings” button is clicked, the username from the form is turned into a DN according to the DN template, and a Bind operation request is sent to the configured LDAP server. Fusion reports whether or not authentication was successful:
Optional Configuration: Roles and Groups Mappings
A Fusion role is a bundle of permissions tailored to the access needs of different kinds of users. Access to services and data for LDAP-managed users is controlled by mappings from LDAP users and groups to Fusion roles.
Roles can be assigned globally or restricted to specific LDAP groups. The security realm configuration panel contains a list of all Fusion roles with a checkbox for each, used to assign that role to all users in that realm. LDAP group names can be mapped directly to specific Fusion roles and LDAP group search and filter queries can also be used to map kinds of LDAP users to specific Fusion roles.
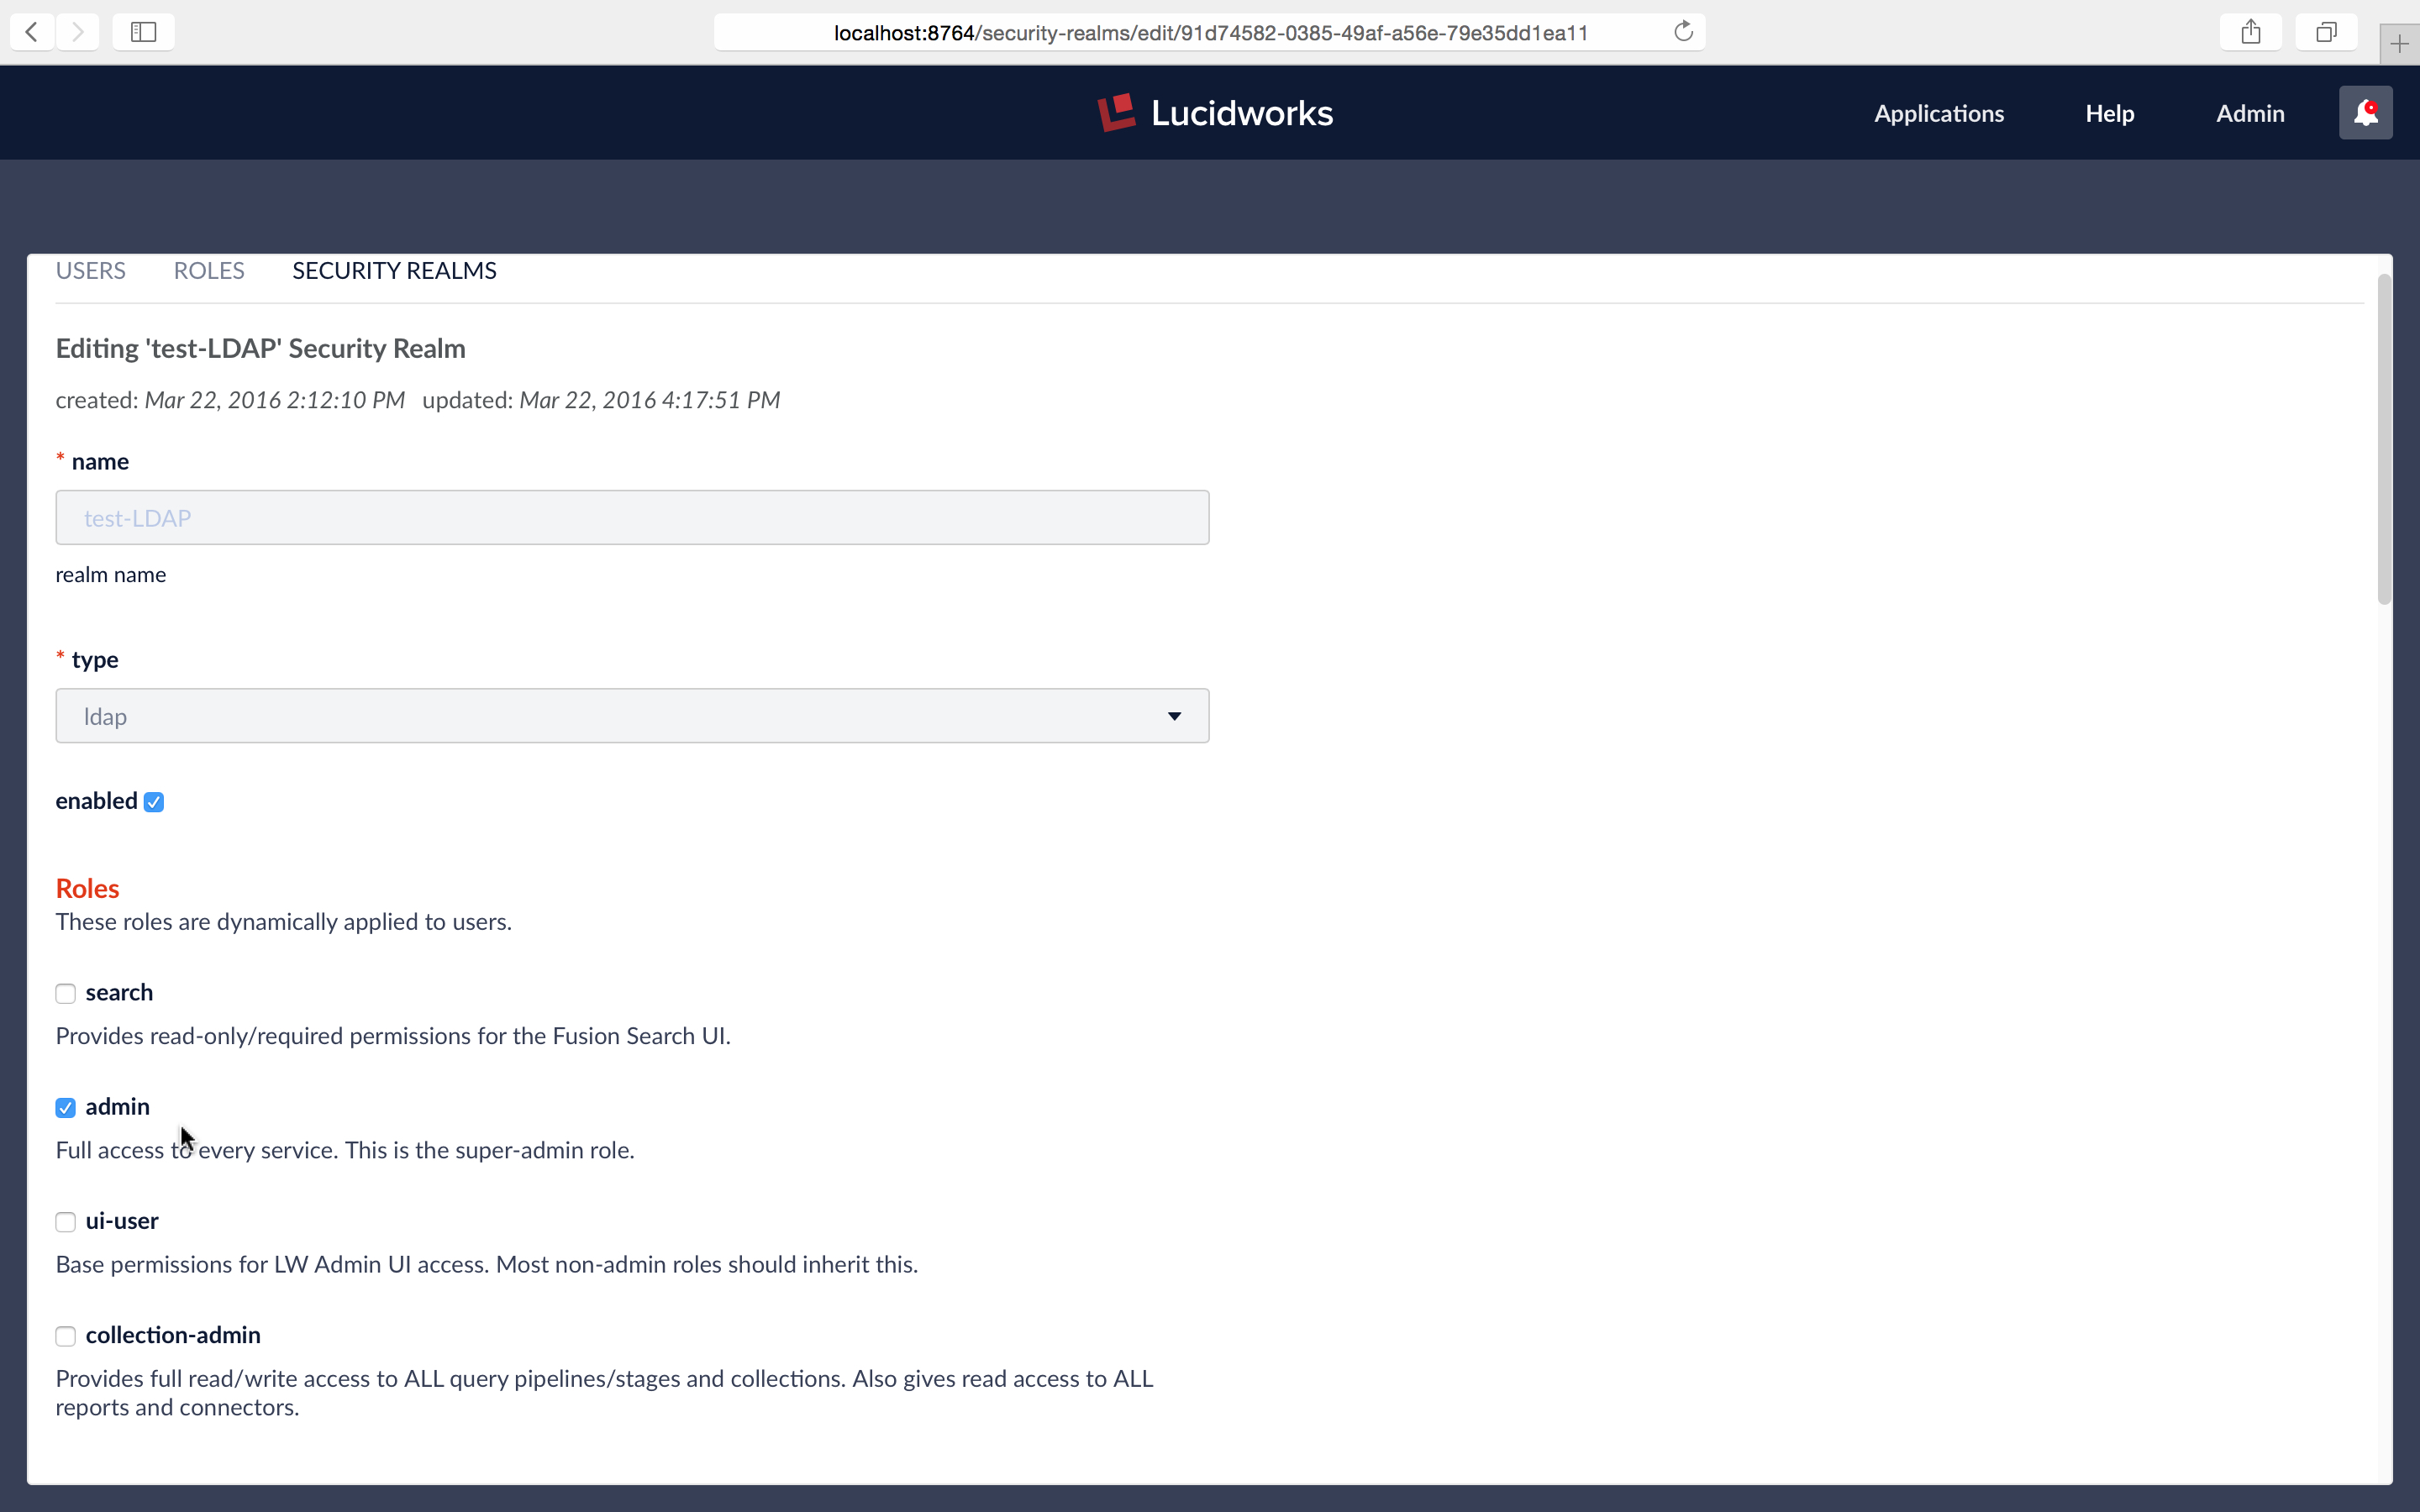
Putting It All Together
To see how this works, while logged as the Fusion native realm admin user, I edit the LDAP security realm named “test-LDAP” so that all users from this realm have admin privileges:
At this point my Fusion instance contains two users:
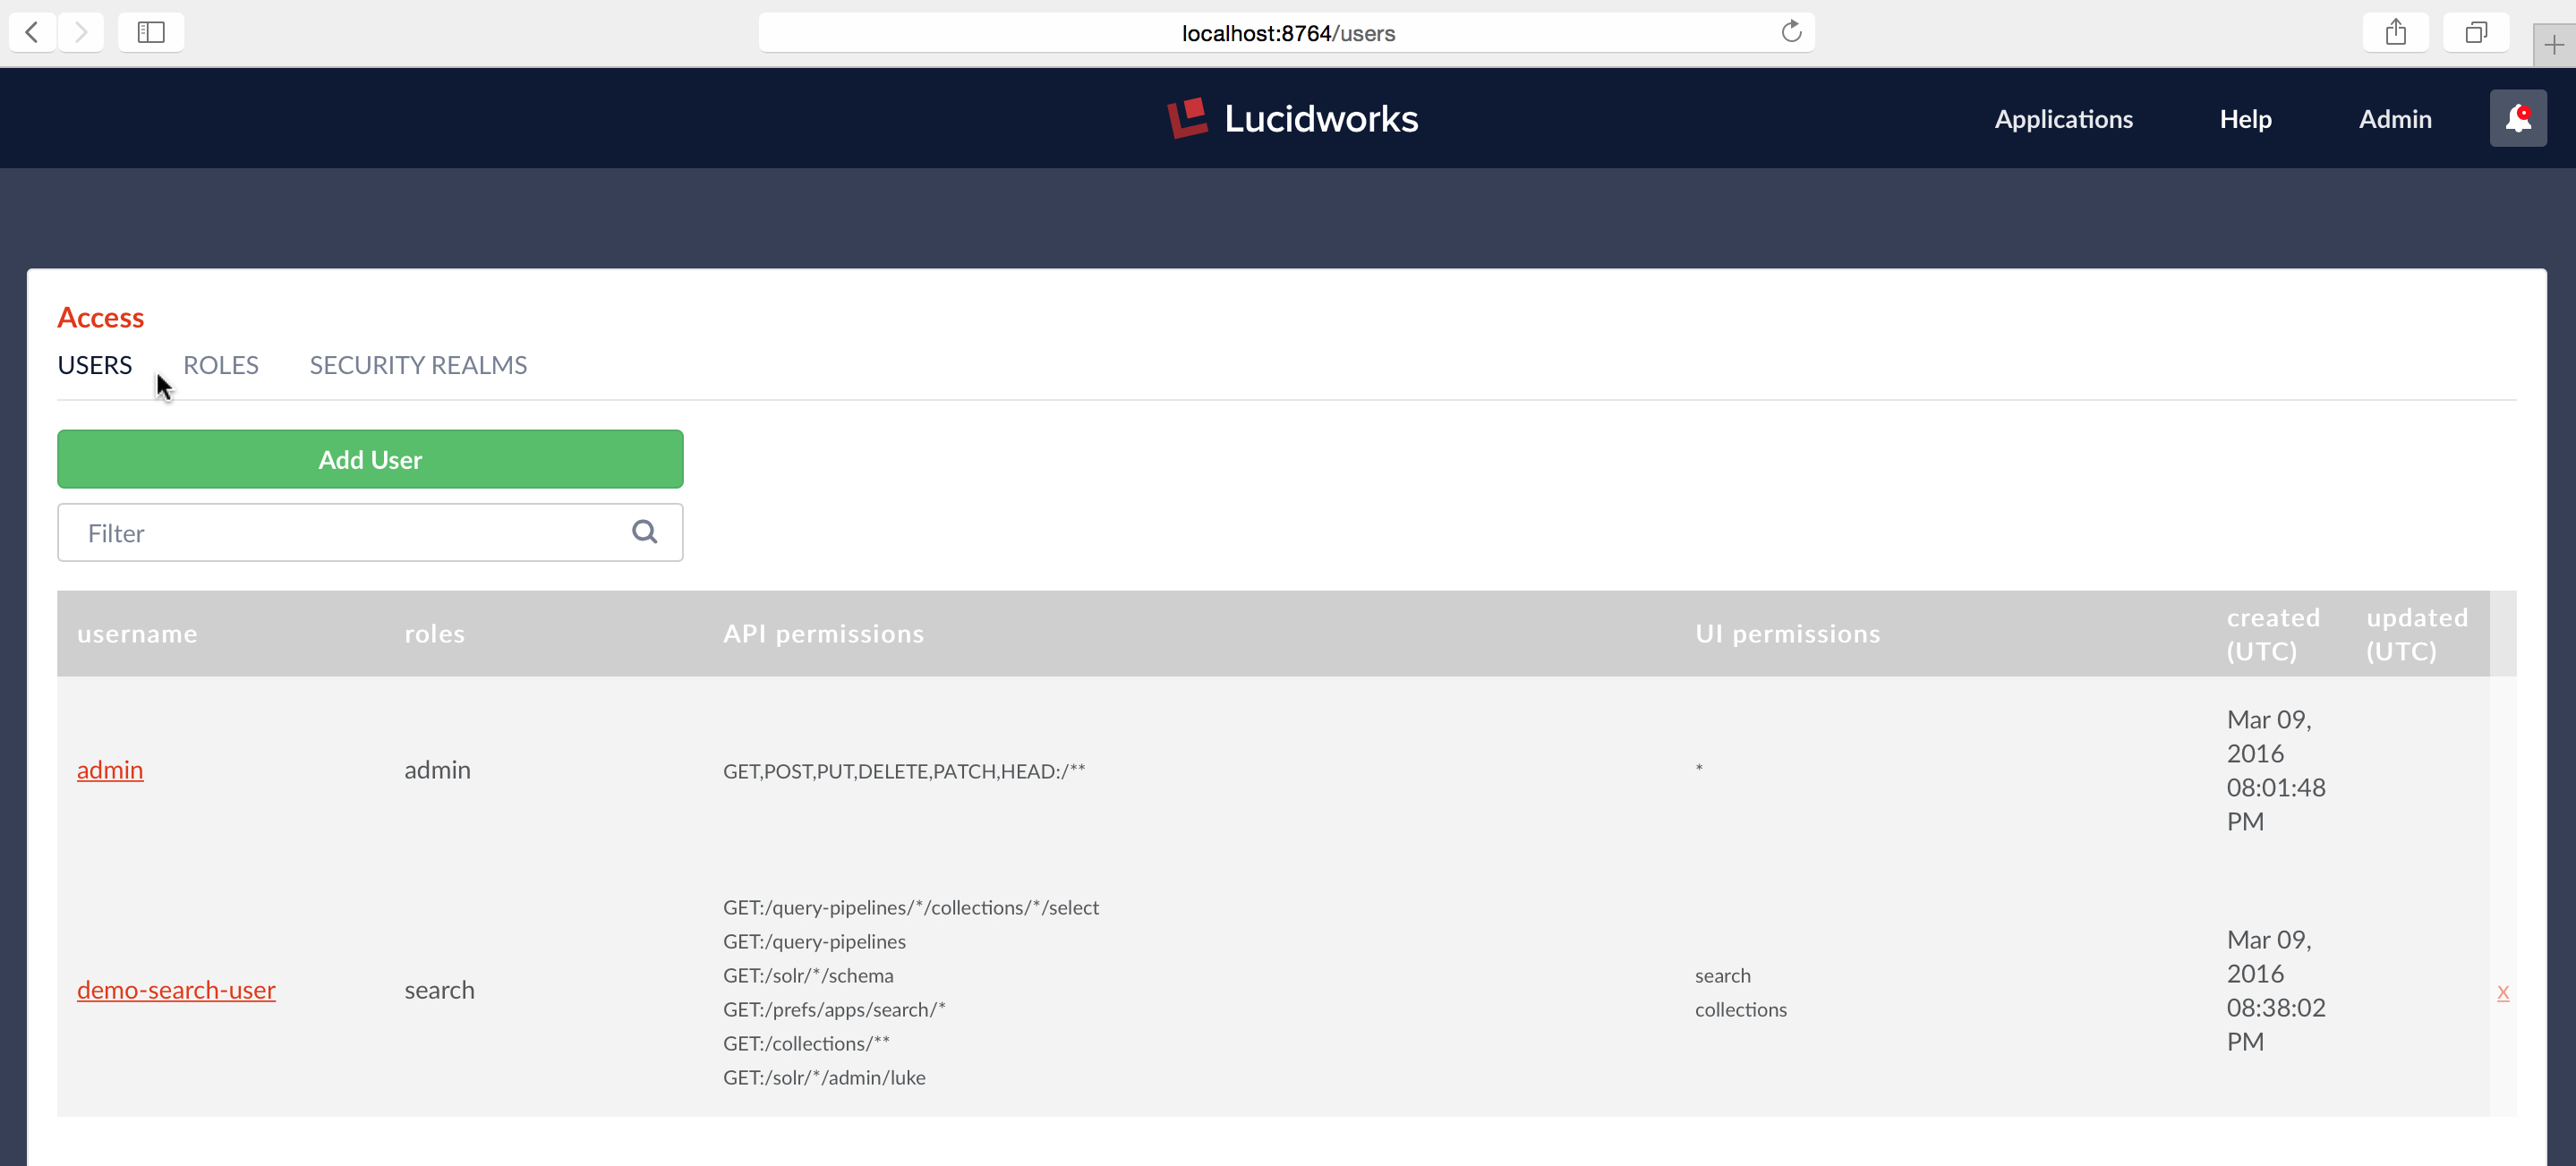
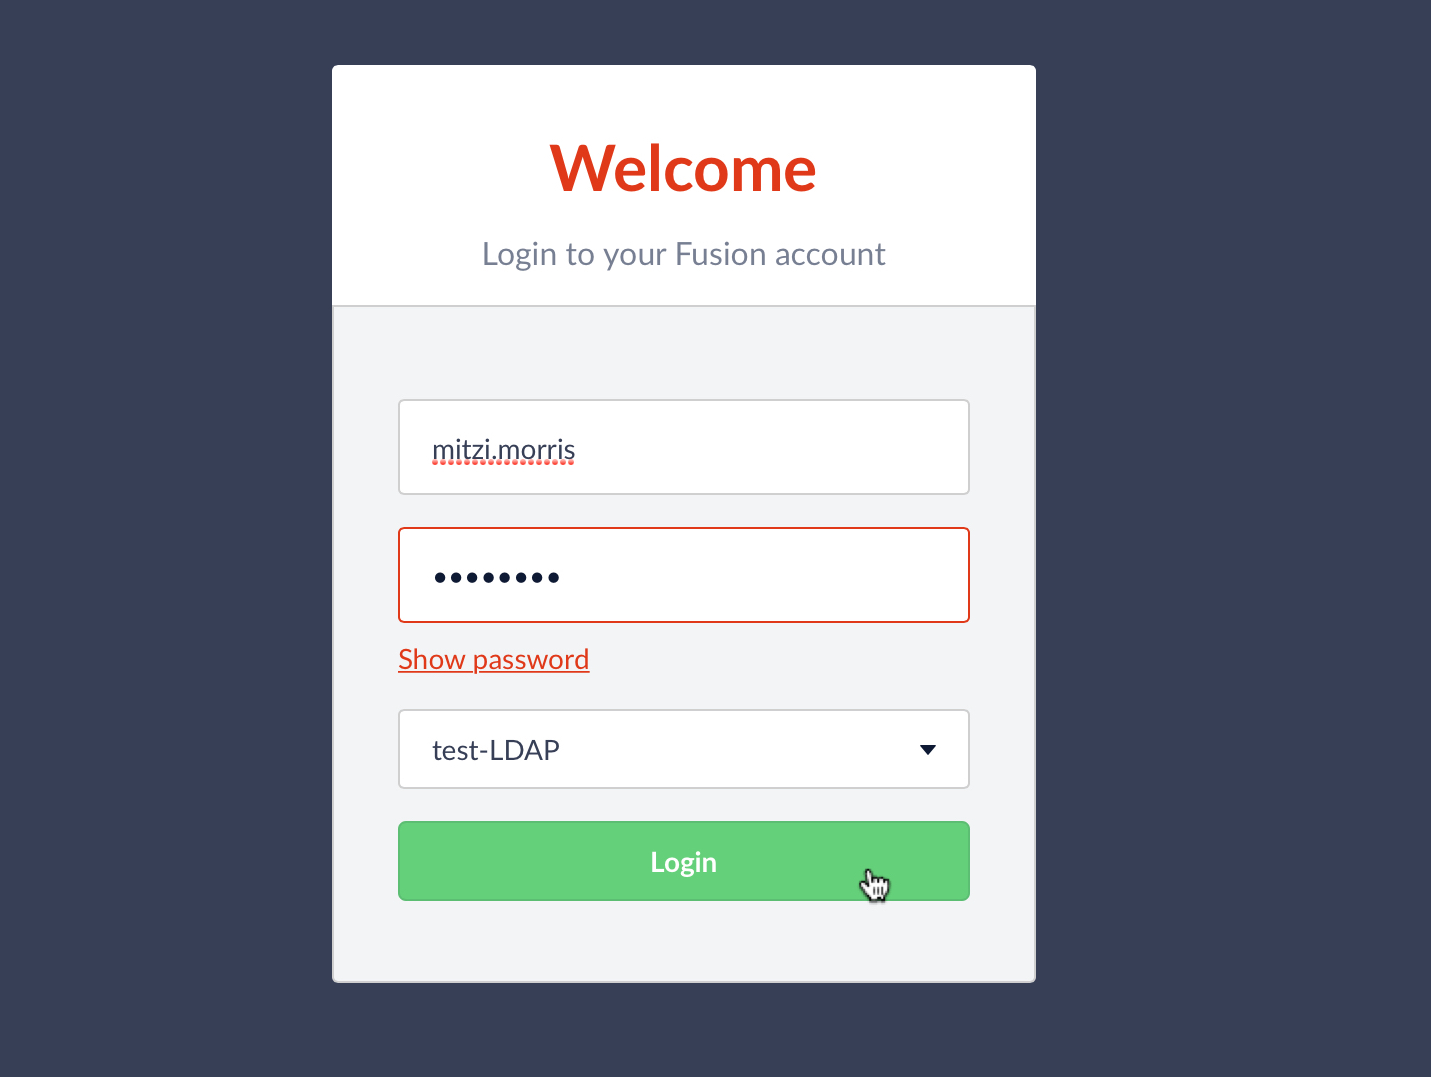
I log out as admin user:

Now I log in using the “test-LDAP” realm:
Because all users from “test-LDAP” realm have admin privileges, I’m able to use the Access Controls application to see all system users. Checking the USERS panel again, I see that there’s now a new entry for username “mitzi.morris”:
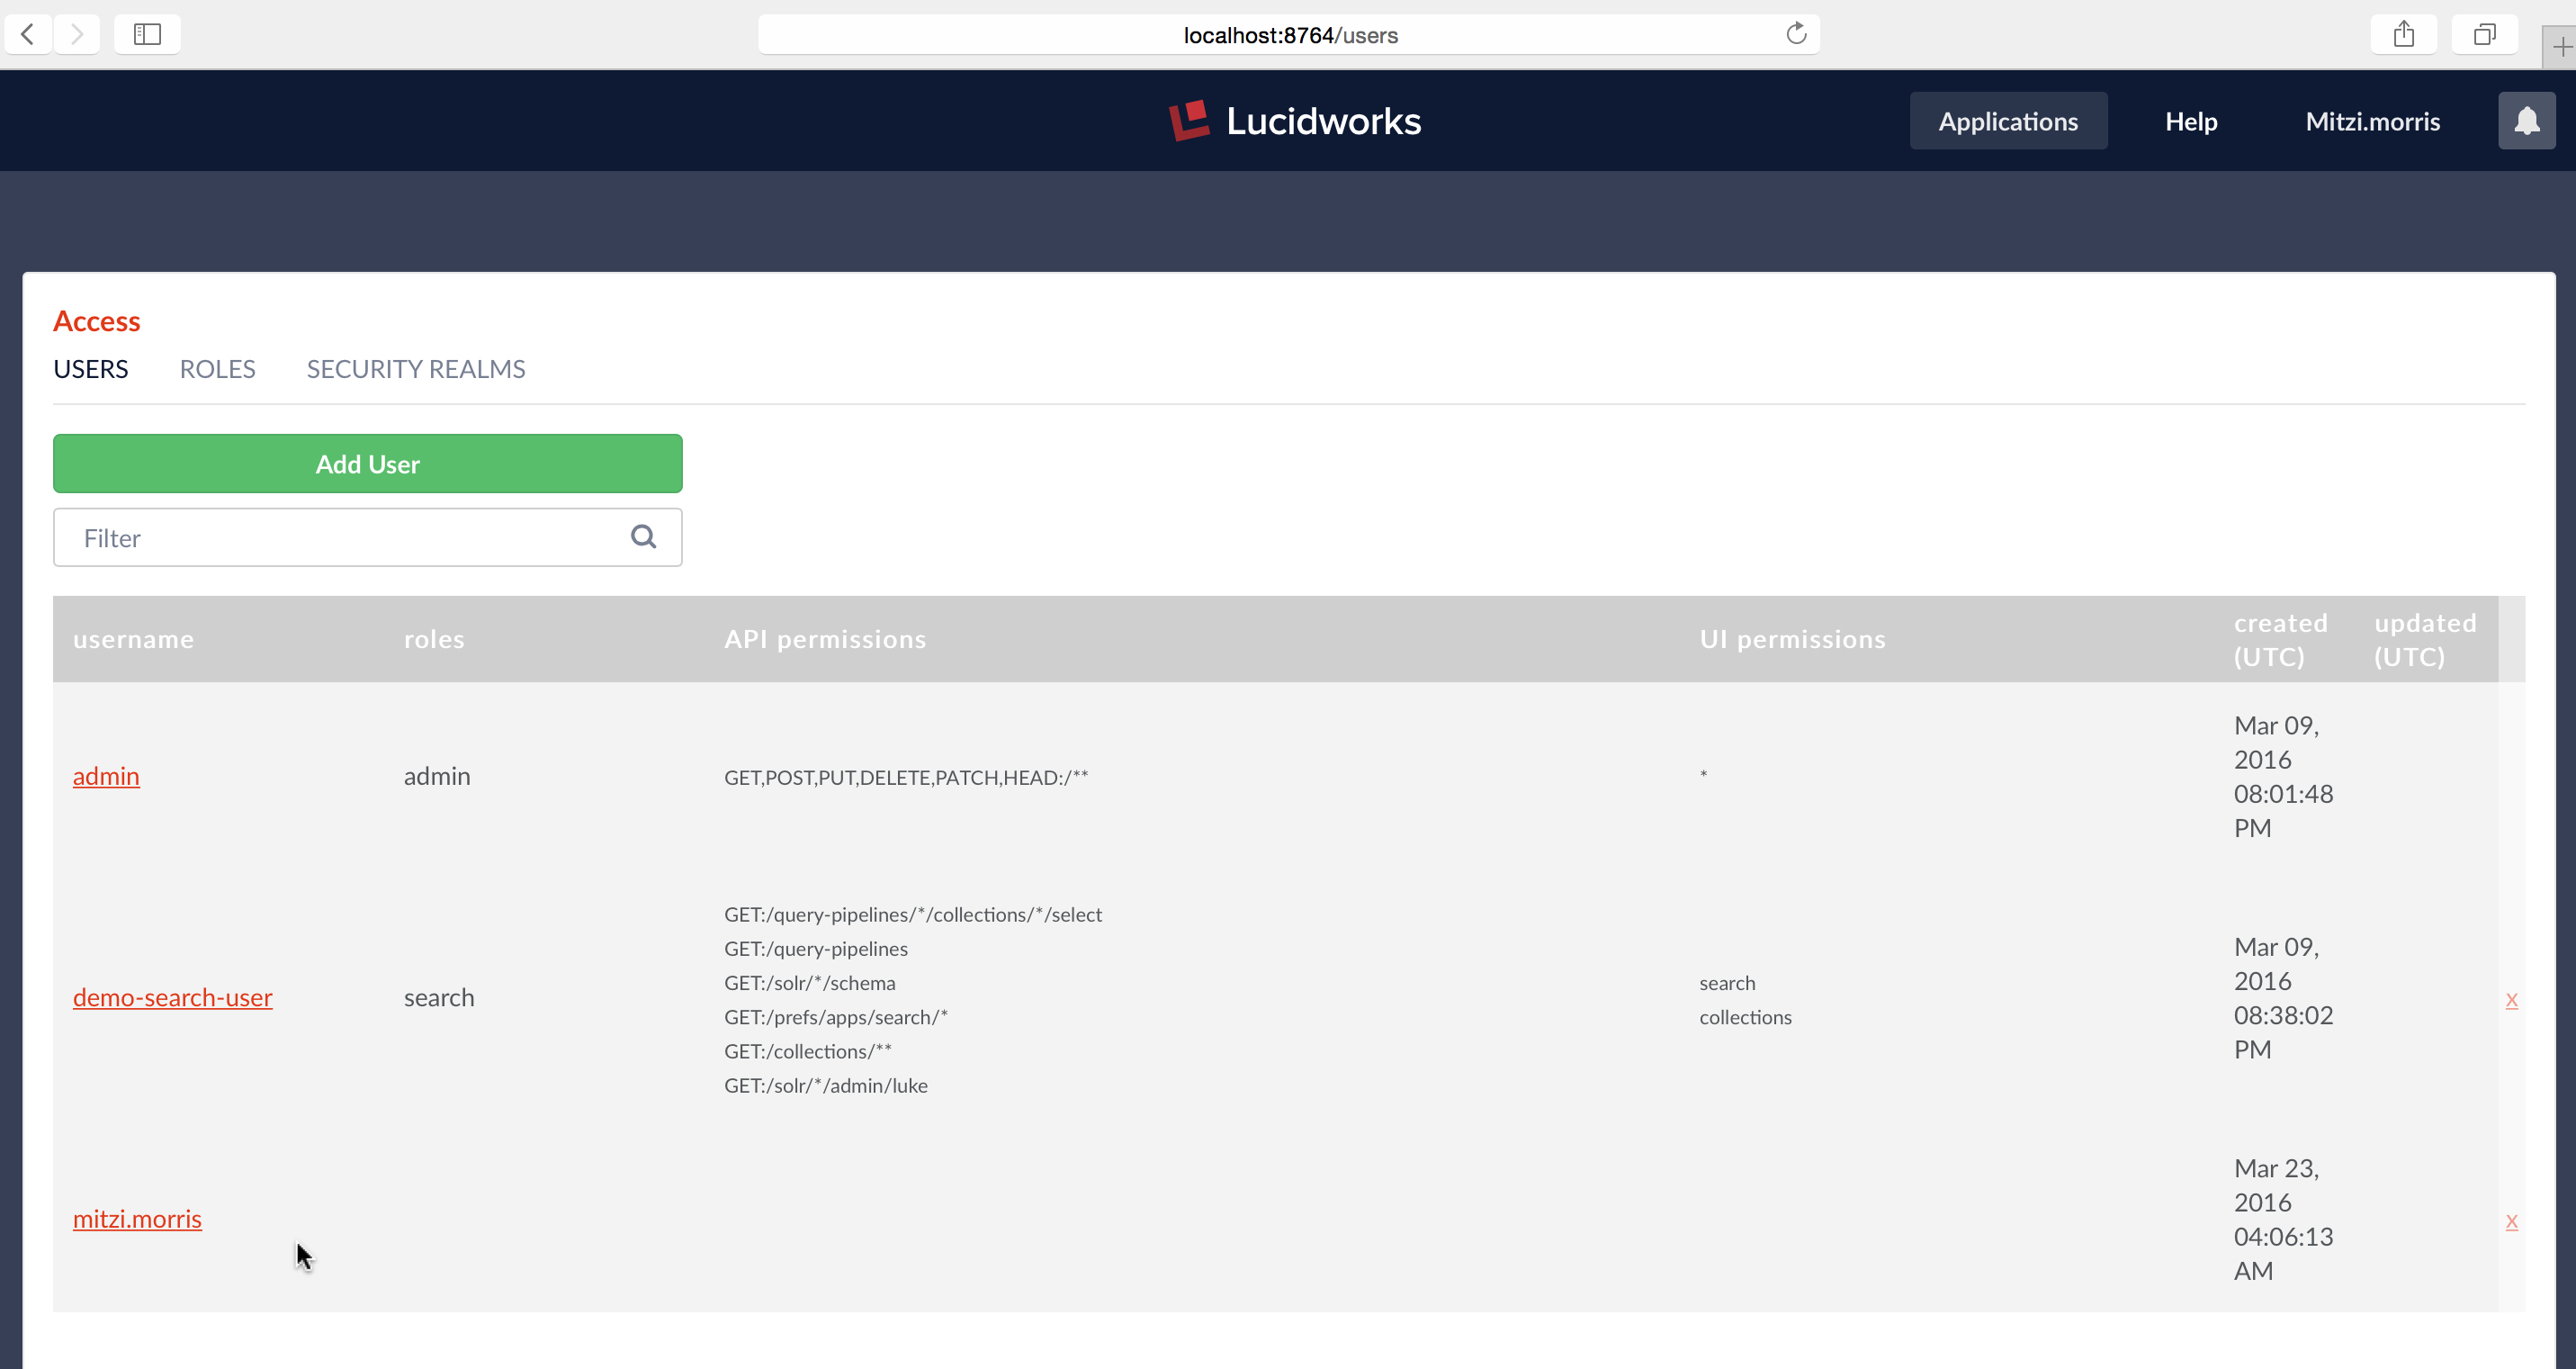
The listing for username “mitzi.morris” in the USERS panel doesn’t show roles, API or UI permissions because this information isn’t stored in Fusion’s internal ZooKeeper. The only information stored in Fusion is the username, realm, and uuid. Permissions are managed by LDAP. When the user logs in, Fusion’s LDAP realm config assigns roles according to the user’s current LDAP status.
Fusion manages all of your Solr data. Fusion’s security mechanisms ensure that only your users see all of their data and only their data, no more, no less. This post shows you how Fusion can be configured to use an external LDAP server for authentication and how to map user and group memberships to Fusion permissions and roles. Future posts in this series will show how to configure Fusion datasources so that document-level permissions sets (ACLs) are indexed
and how to configure search pipelines so that the results set contains only those documents that the user is authorized to see.
Best of the Month. Straight to Your Inbox!
Dive into the best content with our monthly Roundup Newsletter!
Each month, we handpick the top stories, insights, and updates to keep you in the know.