Running Lucidworks Fusion 5 on Azure Kubernetes
How to run Lucidworks Fusion on Azure Kubernetes an AI-powered search platform that is easy to install, customize, upgrade, and scale to meet the most demanding workloads.

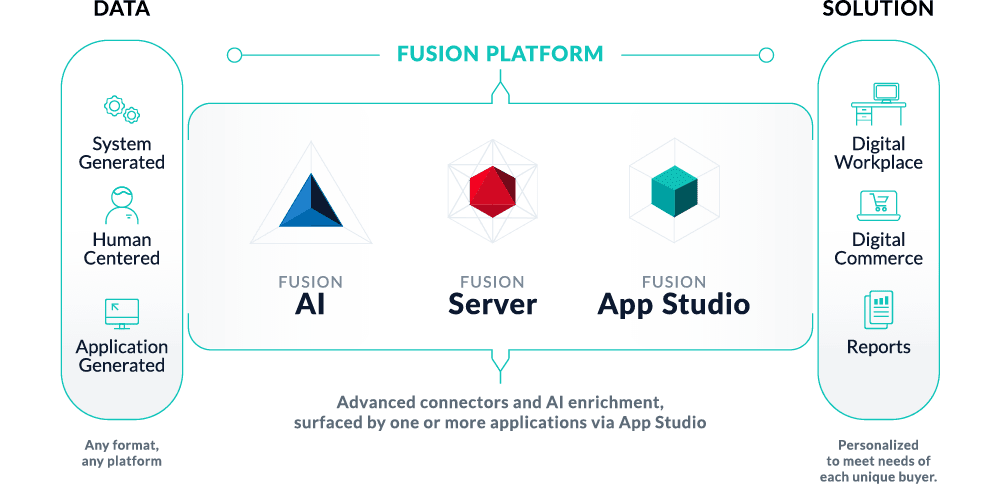
Lucidworks recently reached a major milestone for our flagship product Fusion by successfully migrating to a cloud-native microservices architecture orchestrated by Kubernetes (K8s). The result is an AI-powered search platform that is easy to install, customize, upgrade, and scale to meet the most demanding workloads. Fusion 5 allows our customers to dynamically manage application resources as utilization ebbs and flows, allowing for better cost optimization in the cloud.
Coinciding with our journey to K8s, cloud providers have invested heavily to provide managed offerings that alleviate the complexity of running Kubernetes. Of course there is plenty of hype around K8s, but after spending the better part of a year with this platform, I’m confident there’s only one right way to run large-scale, distributed enterprise applications like Lucidworks Fusion 5: Kubernetes!
I started my journey with Kube on Google Kubernetes Engine (GKE) and have been spoiled in that regard, as Google is still the clear leader in this space. GKE makes Kubernetes fun and easy! But as an application vendor, we can’t dictate which Kube platform our customers run on, and as of late, we’ve seen growing interest around Azure Kubernetes Service (AKS). Our aim is for Lucidworks to be easy to do business with.
From Fusion’s perspective, once Kubernetes is up-and-running, it’s all the same to our containers as we don’t have any cloud provider-specific dependencies in our application. Let’s put this claim to test by installing Fusion 5 on AKS and indexing some data from Azure Blob Storage. If you don’t want to work with Kubernetes directly, let Lucidworks run your mission-critical search applications for you with our Managed Search and Managed Fusion offerings, which, as you might have guessed, run on K8s.
Getting Started With Fusion on AKS
As with any cloud provider, you need an account and install the command-line tools. For Azure, you can set up a new account using the instructions provided here.
Once you have an account, you need to install the azure-cli tool (az) using these instructions. To confirm your account access and command-line tools are set up correctly, run the az login command (az login –help to see available options).
As a Kubernetes application provider, Lucidworks is faced with a decision on how to support the various managed k8s offerings like GKE and AKS. After working with several early adopters of Fusion 5, we learned that most ops teams want to make their own decisions around how to provision and configure Kubernetes clusters.
However, we also want to help interested users, especially ones with minimal experience with Kubernetes. So we provide utility scripts for GKE, AKS, and EKS in the following github repo.
The scripts provide an option to create Kubernetes clusters that are suitable for demo / proof-of-concept purposes only.
To follow along with this article, please clone the fusion-cloud-native repo as you’ll need to run the setup_f5_aks.sh script in the steps to follow.
git clone https://github.com/lucidworks/fusion-cloud-native.git
If you’re not a git user, simply download the project ZIP file and extract it:
wget https://github.com/lucidworks/fusion-cloud-native/archive/master.zip
unzip master.zip && mv fusion-cloud-native-master fusion-cloud-native
Let’s assume your working directory for the rest of this blog is:
$HOME/fusion-cloud-native
Use Helm to Manage Apps on K8s Cluster
Helm is a popular package manager for Kubernetes that helps you install and manage applications on your K8s cluster. Regardless of which Kubernetes platform you’re using, e.g. AKS, GKE, EKS, OpenShift, you need to install Helm as it is required to install Fusion. For this post, I’m going to use Helm V3 rc1 instead of the latest stable Helm V2 release.
[Tiller, the server-side component of Helm V2, has known security concerns, so it’s common for k8s administrators to not allow the use of Tiller, especially for production clusters. Helm V3 does not use Tiller because of these security concerns, so I wanted to gain some experience with it even though Helm V3 is still in release candidate status. To be clear though, Tiller is great for quickly installing Helm charts in dev and test environments and the concerns mainly apply to production.]
Download the latest Helm V3 release here.
I’m using rc1 on my Mac from here.
Extract the Helm V3 archive into the $HOME/fusion-cloud-native directory, for instance, on my mac, I did:
cd $HOME/fusion-cloud-native

wget https://get.helm.sh/helm-v3.0.0-rc.1-darwin-amd64.tar.gz

tar zxf helm-v3.0.0-rc.1-darwin-amd64.tar.gz

export PATH=$HOME/fusion-cloud-native/darwin-amd64:$PATH

helm version --short
You should see something like: v3.0.0-rc.1+gee77ae3
If you’re already using Helm V2, then make sure the Helm V3 executable is ahead in your path for this exercise.
Azure Prerequisites
To launch a cluster in AKS (or pretty much do anything with Azure) you need to setup a Resource Group. Resource Groups are a way of organizing and managing related resources in Azure. For more information about resource groups, see here.
You also need to choose a location where you want to spin up your AKS cluster, such as westus2. For a list of locations you can choose, here.
Use the Azure console in your browser to create a resource group or simply do:
az group create -g $AZURE_RESOURCE_GROUP -l $AZURE_LOCATION
On my side, I’m using AZURE_RESOURCE_GROUP=LW-Blog and AZURE_LOCATION=westus2 but you should choose an appropriate name and location for your environment.
To recap, you should have the following requirements in place:
- Azure Account setup
- azure-cli (az) command-line tools installed
- az login working
- Cloned the fusion-cloud-native repo from github
- Added Helm V3 to your path for your current working shell
- Created an Azure Resource Group and selected a location to launch the cluster
Now you’re ready to launch an AKS cluster and install Lucidworks Fusion 5!
Launch Cluster and Install Lucidworks Fusion
Using the script from the fusion-cloud-native repo, run the following command:
./setup_f5_aks.sh -c <CLUSTER_NAME> -p <AZURE_RESOURCE_GROUP> --preview
To see the full script usage, do:
./setup_f5_aks.sh --help
On my side, I ran:
./setup_f5_aks.sh -c lw-blog-1 -p LW-Blog --preview
By default, our script installs Fusion into the default namespace; think of a K8s namespace as a virtual cluster within a physical cluster. You can install multiple instances of Fusion in the same cluster in separate namespaces. However, please do not install more than one Fusion release in the same namespace.
You can override the namespace using the -n option. In addition, our script uses f5 for the Helm release name; you can customize this using the -r option. Helm uses the release name you provide to track a specific instance of an installation, allowing you to perform updates and rollback changes for that specific release only.
Our script also allows you to enable preview options, as I’ve done here using –preview, which enables soon-to-be-released features for AKS, such as deploying a multi-zone cluster across 3 availability zones for higher availability guarantees. For more information about the Availability Zone feature, see here. You don’t have to enable these features to run Fusion but I wanted to see how auto-scaling and multi-AZ works with AKS as these are features I’ve grown to love with GKE.
It takes a while for AKS to spin-up the new cluster. The cluster will have three Standard_D4_v3 nodes which have 4 CPU and 16 GB of memory. Behind the scenes, our script just calls the az aks create command. Azure enforced a ridiculous CPU quota of 10 CPU on me initially and I had to file a support request to increase it, ymmv. Frankly, I’ve never had so much trouble getting a cloud provider to let me spend more money on their platform! Alternatively, you can use the -y parameter with our script to decrease the number of nodes requested, such as -y 2.
Once the cluster comes online, the script uses Helm to pull the latest Fusion 5 Helm chart from our public repository. The Helm chart contains definitions for all the services, deployments, statefulsets, and so on. The public Docker images for the Fusion services are hosted in Docker Hub.
Our script waits for the Fusion API Gateway service to rollout successfully, which can take upwards of 7-8 minutes as AKS needs to pull the images over from DockerHub. Once our script finishes, it will output the external IP address for the Fusion Gateway service, which performs authentication, authorization, and API routing for other Fusion services. At the end of our script, you should see output similar to:
Fusion 5 Gateway service exposed at: Some-External-IP:6764
WARNING: This IP address is exposed to the WWW w/o SSL! This is done for demo purposes and ease of installation. You are strongly encouraged to configure a K8s Ingress with TLS, see here.
After configuring an Ingress, please change the ‘proxy’ service to be a ClusterIP instead of LoadBalancer
We’ve exposed the Fusion API Gateway on an external IP for easy access to the Fusion Admin UI. However, you should lock that down behind a Kubernetes Ingress with TLS enabled, especially before you load any secure data into Fusion. We’ll leave that as an exercise for the ambitious reader for now (https://docs.microsoft.com/en-us/azure/aks/ingress-basic) and proceed to logging into the Fusion Admin UI using the exposed IP on port 6764.
Customizing Fusion With Helm
Fusion aims to be well-configured out-of-the-box, but you can customize any of the built-in settings using a custom values yaml file. If you use one of our setup scripts, such as setup_f5_aks.sh, then it will create this file for you the first time you run it using the naming convention:
<provider>_<cluster>_<relase>_fusion_values.yaml.
For my cluster above, the script created: aks_lw-blog-1_f5_fusion_values.yaml. Look for it in the directory where you ran the script. Keep this file handy as you’ll need it to customize Fusion settings and upgrade to a newer version.
Take a moment to look over the custom values yaml file created by the script for your cluster. For long running clusters, such as for production, you should keep this file in source control so you have a record of changes made to the Fusion installation.
At this point, you should have Fusion running in AKS. Run the following command to see a list of pods for Fusion:
kubectl get pods -l app.kubernetes.io/part-of=fusion
Here’s a look at some of the Fusion pods running in the AKS cluster:
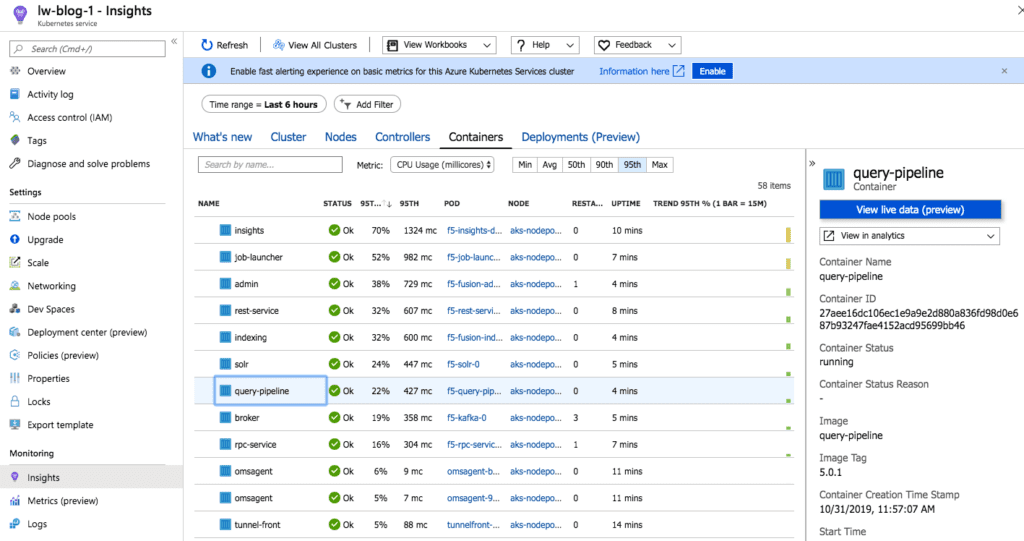
For an overview of the various Fusion 5 microservices, see here.
When you first launch Fusion, you need to provide a password for the “admin” user. Once logged in, you need to create a new Fusion app as shown in the screenshot below:

Creating a new app can take upwards of a minute as it creates a number of Solr collections, Spark jobs, and pipelines.
Multiple Availability Zone Preview
Recall when I launched my cluster, I passed the –preview option, which enabled the multi-zone feature for AKS using the –node-zones 1 2 3 arg passed to the az aks create command. If you launched more than one node, you should have multiple Solr pods distributed across the nodes in your cluster. Verify using:
kubectl get pods -l app.kubernetes.io/name=solr -o wide
One cool thing the Fusion Helm chart does is set the solr_zone Java System property on each Solr pod. To confirm, use kubectl to port forward to a running Solr pod:
kubectl port-forward f5-solr-0 8983
Specifically look for the -Dsolr_zone under Args on the Solr dashboard. It should be set to one of the availability zones in AKS. The Fusion chart sets this property so you can utilize it to drive replica placements for a collection using auto-scaling policies, such as:
{"replica":"#EQUAL", "shard":"#EACH", "sysprop.solr_zone":"#EACH"}
It does us no good to provision Kubernetes nodes across zones for HA if Solr places replicas for a collection on nodes in the same zone.
If you’d like more information about running Solr in Kubernetes, see my previous article.
Load Data From Azure Blob Storage
An empty Fusion install isn’t very interesting, let’s use Fusion’s Parallel Bulk Loader job (https://doc.lucidworks.com/fusion/5.8/557/parallel-bulk-loader) to load some data from Azure’s Blob Storage service. I’m not going to cover how to get data into Azure Blob Storage and will just defer that to the Azure docs. In general, Fusion 5 makes loading data from cloud storage like S3, GCS, and Azure a breeze.
In my Azure account, I have a parquet file containing simulated log data. Behind the scenes our Parallel Bulk Loader uses Spark to ingest data from NoSQL data sources and big data file systems like Azure Blog Storage or Data Lake.
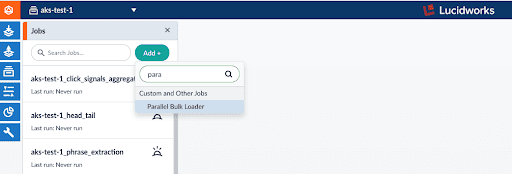
In the aks-test-1 app, choose the Jobs menu option (under the icon that looks like a file drawer ![]() ) and select the Parallel Bulk Loader as seen below:
) and select the Parallel Bulk Loader as seen below:
{
  "type": "parallel-bulk-loader",
  "id": "load_data",
  "format": "parquet",
  "path": "wasbs://datagen@lw1fusion1test1data.blob.core.windows.net/...parquet",
  "outputCollection": "aks-test-1",
  "defineFieldsUsingInputSchema": true,
  "sparkConfig": [
    {
      "key": "spark.hadoop.fs.wasbs.impl",
      "value": "org.apache.hadoop.fs.azure.NativeAzureFileSystem"
    },
    {
      "key": "spark.hadoop.fs.azure.account.key.lw1fusion1test1data.blob.core.windows.net",
      "value": "SECRET"
    }
  ],
  "shellOptions": [
    {
      "key": "--packages",
      "value": "org.apache.hadoop:hadoop-azure:2.7.3"
    },
    {
      "key": "--exclude-packages",
      "value": "com.fasterxml.jackson.core:jackson-core"
    }
  ]
}
This is just an example to show how to index data from Azure blob storage using wasbs file system; change the path to a dataset you want to index. The key settings in this example are the –packages in shellOptions to load the wasbs filesystem into Spark, and the spark.hadoop.fs.wasbs.impl and spark.hadoop.fs.azure.account.key.<storage_account_name>.blob.core.windows.net settings under sparkConfig. These are needed by Spark to read data from Azure; see here. Using a similar configuration adapted for your environment, you should be able to load data from Azure Blob Storage or Azure Data Lake.
Before wrapping up, I want to cover how upgrades work with Fusion 5 as it’s one of the more enticing features offered by K8s.
Upgrading Fusion in Kubernetes
One of the most powerful features provided by Kubernetes and a cloud-native microservices architecture is the ability to do a rolling update on a live cluster. One of my primary goals when designing Fusion 5 was to allow customers to upgrade from Fusion 5.x.y to a later 5.x.z version on a live cluster with zero downtime or disruption of service.
When Kubernetes performs a rolling update to an individual microservice, there will be a mix of old and new services in the cluster concurrently (only briefly in most cases) and requests from other services will be routed to both versions. Consequently, Lucidworks ensures all changes we make to our service do not break the API interface exposed to other services in the same 5.x line of releases. We also ensure stored configuration remains compatible in the same 5.x release line.
Lucidworks releases minor updates to individual services frequently, so our customers can pull in those upgrades using Helm at their discretion. To upgrade your cluster at any time, do:
./setup_f5_aks.sh -c <CLUSTER_NAME> -p <AZURE_RESOURCE_GROUP> --upgrade
The script automatically pulls in the latest chart updates from our Helm repository and deploys any updates needed by doing a diff of your current installation and the latest release from Lucidworks. To see what would be upgraded, you can pass the –dry-run option to the script.
K8s Does Heavy Lifting for Installation, Upgrades and Scaling
If you followed along to this point, you should have the latest Fusion 5 up-and-running on AKS and hopefully were able to index some of your data from Azure Blob Storage. This is great progress and I’m pleased to see my claim that once Kubernetes is up, it’s all the same to Fusion!
This is why I think Kubernetes is so powerful–large scale, distributed systems can rely on K8s doing most of the heavy lifting around installation, upgrades, and scaling, in addition to the cloud providers making it easier than ever to operate Kubernetes. I could probably spend another 10 pages going over how to run Fusion on Kube, but let’s save that for another article. For now, bon voyage with Fusion 5 and Kubernetes!
LEARN MORE
Contact us today to learn how Lucidworks can help your team create powerful search and discovery applications for your customers and employees.